Custom
Attach free IPv6 address segments to host machines
Some machines don't have an IPv6 /64 subnet on the machine itself, here is a method given to attach an IPv6 subnet for free.
Here is a solution using the 6in4 method for a host machine that doesn't have an IPv6 address on its own.
TIP
The operations on this page must be performed on the original system, and ensure that no other scripts from this project are installed(Except for PVE, which needs to be installed first), as this may lead to environment conflicts.
Here are the platforms that are currently running in 2023 that offer IPv6 subnets for free.
| Supported Platforms | Corresponding Required Installation Packages | Protocols | Number of Channels/Subnets |
|---|---|---|---|
| tunnelbroker.net | ifupdown OR ifupdown2 | v4tunnel OR sit | 3✖/64 OR 5✖/64 |
| tunnelbroker.ch | ifupdown OR ifupdown2 | v4tunnel OR sit | 3✖/64 |
| ip4market.ru | ifupdown OR ifupdown2 | v4tunnel OR sit | 1✖/64 |
| netassist.ua | ifupdown OR ifupdown2 | v4tunnel OR sit | 1✖/64 |
| https://github.com/oneclickvirt/6in4 | ifupdown2 | sit、gre、ipip | custom |
The free platform only solves the problem that IPv6 is not available, it does not provide premium IPv6 bandwidth.
If you need high quality bandwidth, please build your own tunnel. When both ifupdown and ifupdown2 are available, try ifupdown first to see if it can be installed successfully, otherwise install ifupdown2.
After the installation is complete, select which package is installed behind to convert the format.
Initial environment modifications
Execute
touch /etc/cloud/cloud-init.disabledTurn off the automated overwrite of cloud-init first, and then to see what the local machine is using to manage the network, run
systemctl is-active systemd-networkdand
systemctl is-active networkingSee which case this falls into, if it's the former active and the latter inactive, you need to reinstall/DD a system that isn't configured this way, or switch the local machine to use ifupdown/ifupdown2 to manage network execution
# Judge for yourself whether you need to disable the original network management or not
# systemctl stop systemd-networkd
# systemctl disable systemd-networkd
# systemctl stop systemd-networkd.socket
# systemctl disable systemd-networkd.socketIf you want to install ifupdown to control the network, this tool is available on all major linux systems.
apt-get install ifupdown -yIf you want to install ifupdown2 for network management, which is generally only available on debian systems, you can install
apt-get install ifupdown2 -yAfter the installation is complete, select which package is installed behind to convert the format.
systemctl start networking
systemctl enable networkingThen restart the server, check whether the machine's network will be rebooted due to the modification of the case of loss of connection, and runuptimeto observe that the startup has been more than 1 minute before proceeding to the next steps
If it is inactive and active, there is no need to switch the network management program and you can proceed directly to the next step.
Since some servers have default intranet IPv6 routes that will conflict with the tunnel, you can use the following command to remove the default IPv6 routes
default_route=$(ip -6 route show | awk '/default via/{print $3}') && [ -n "$default_route" ] && ip -6 route del default via $default_route dev eth0This assumes that your client's server's default NIC is eth0, you can use ip -6 route to see the default route and replace it, the default route starts with default via, and uses dev to specify the default NIC, you just need to find it according to this rule
Currently supported platforms
tunnelbroker_net
Combined with a script that opens containers with IPv6 addresses with a single click, you can attach an IPv6 address from he to each container
The downside is that the addresses are dark/dirty, and cloudflare's cdn will most likely not be able to latch on, test it yourself
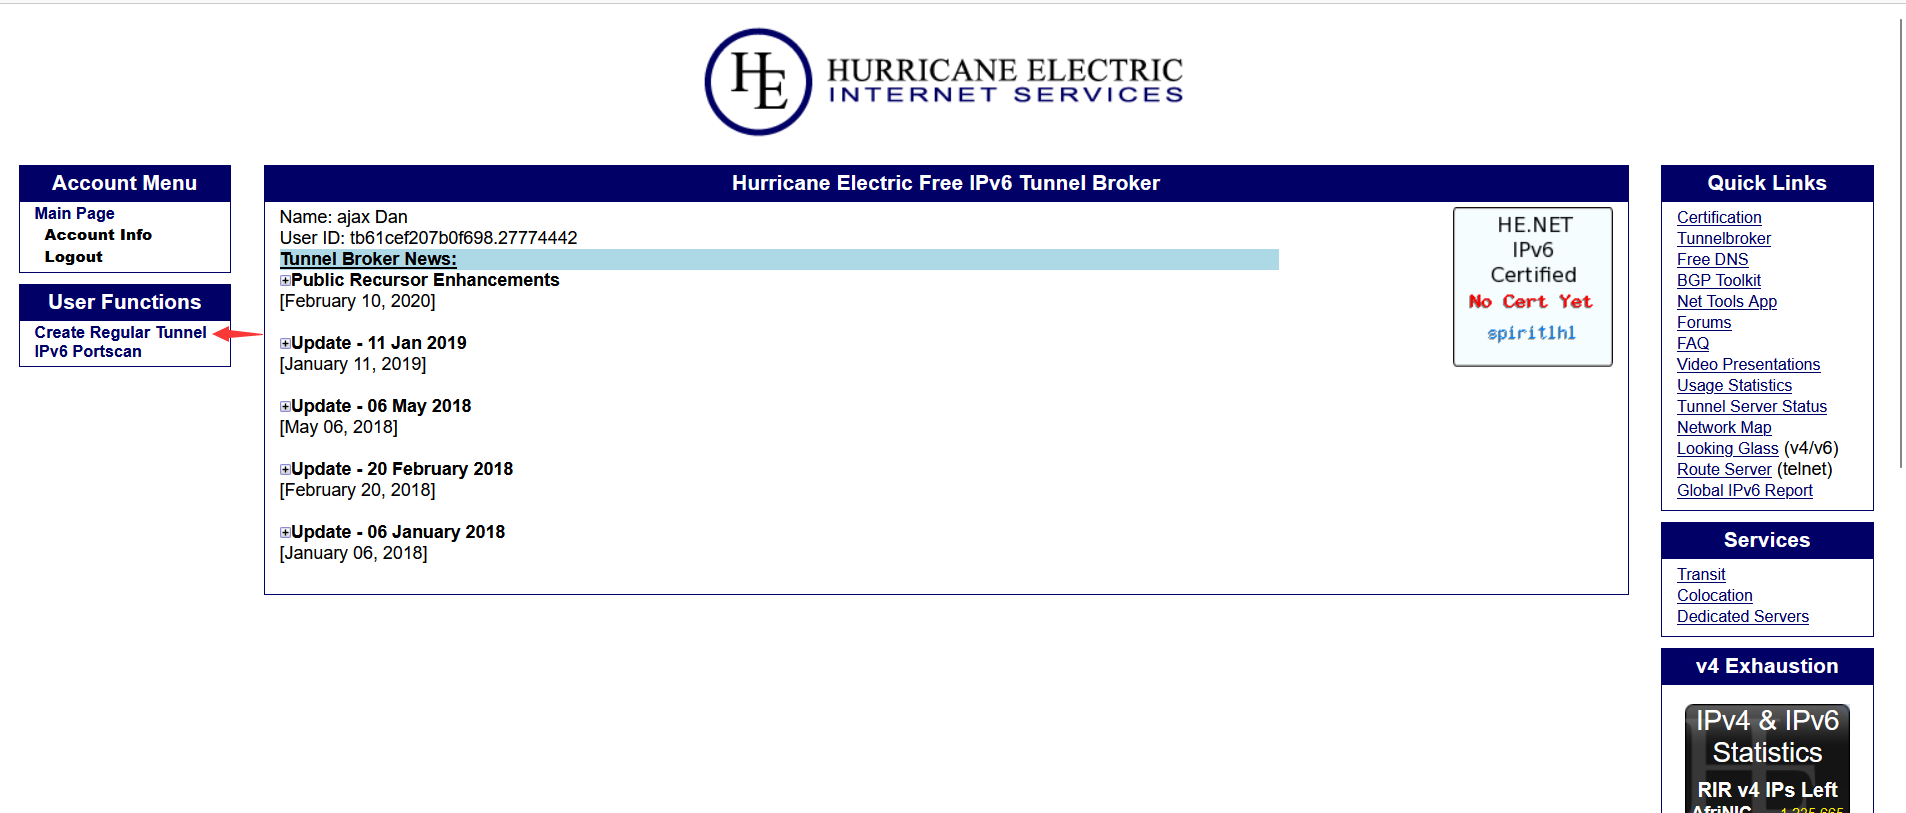
- Register an account at https://tunnelbroker.net/ and click
Create Regular Tunnelon the left.
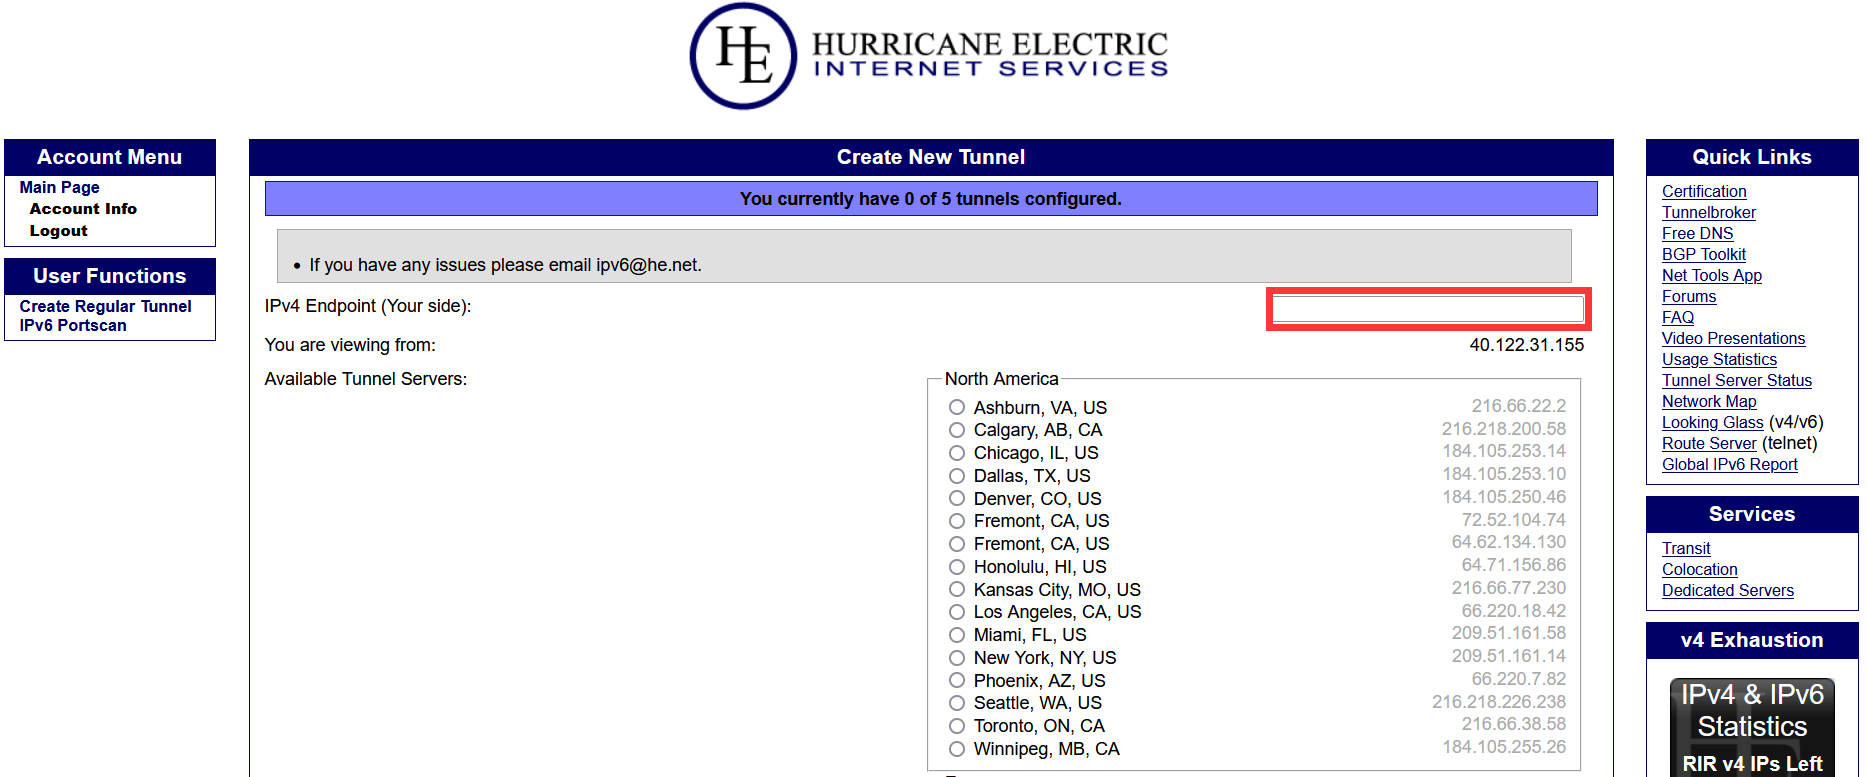
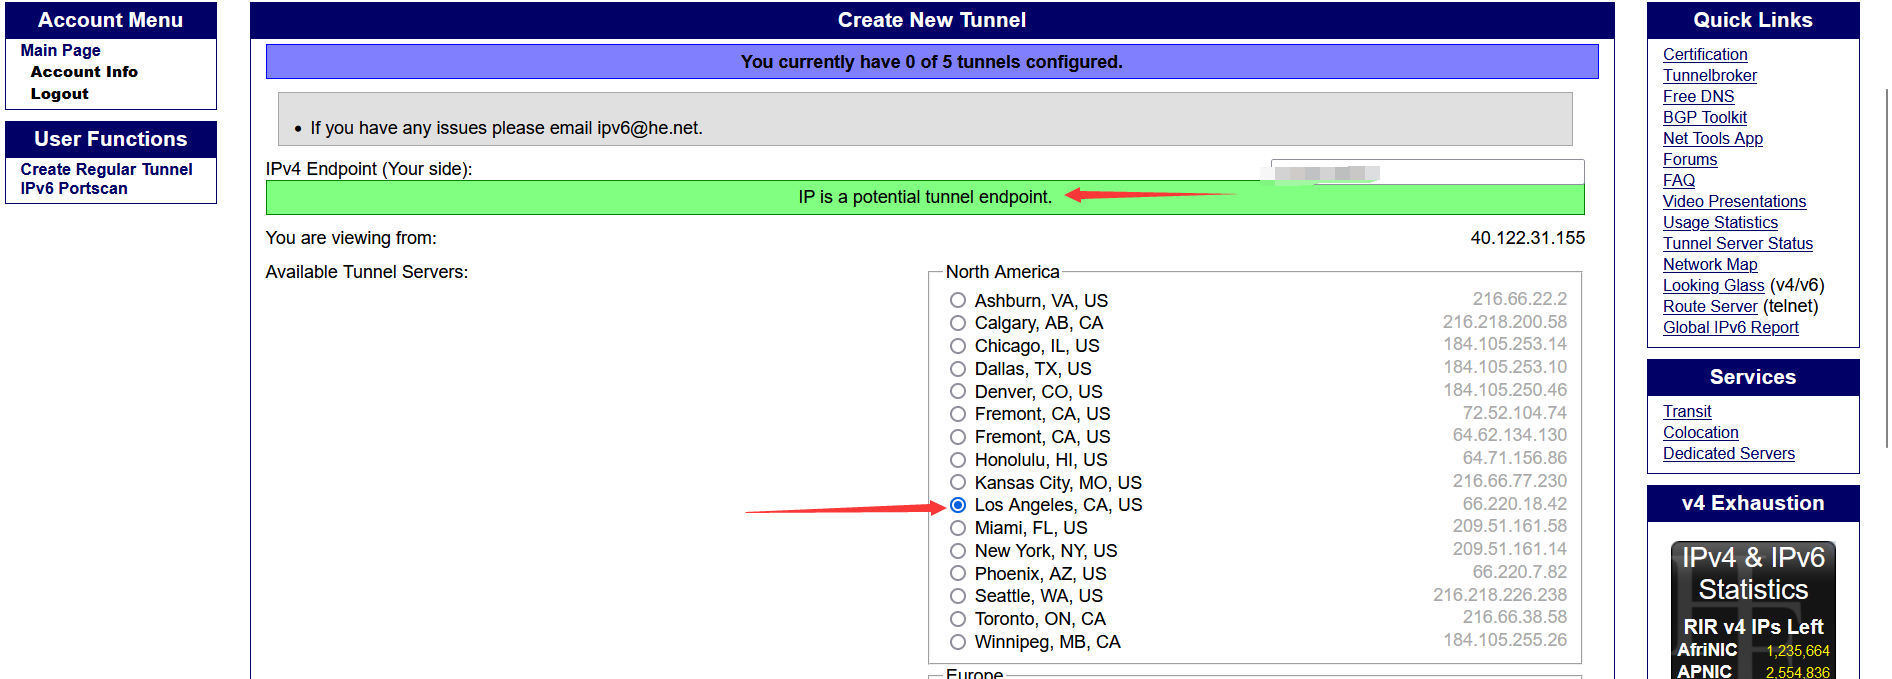
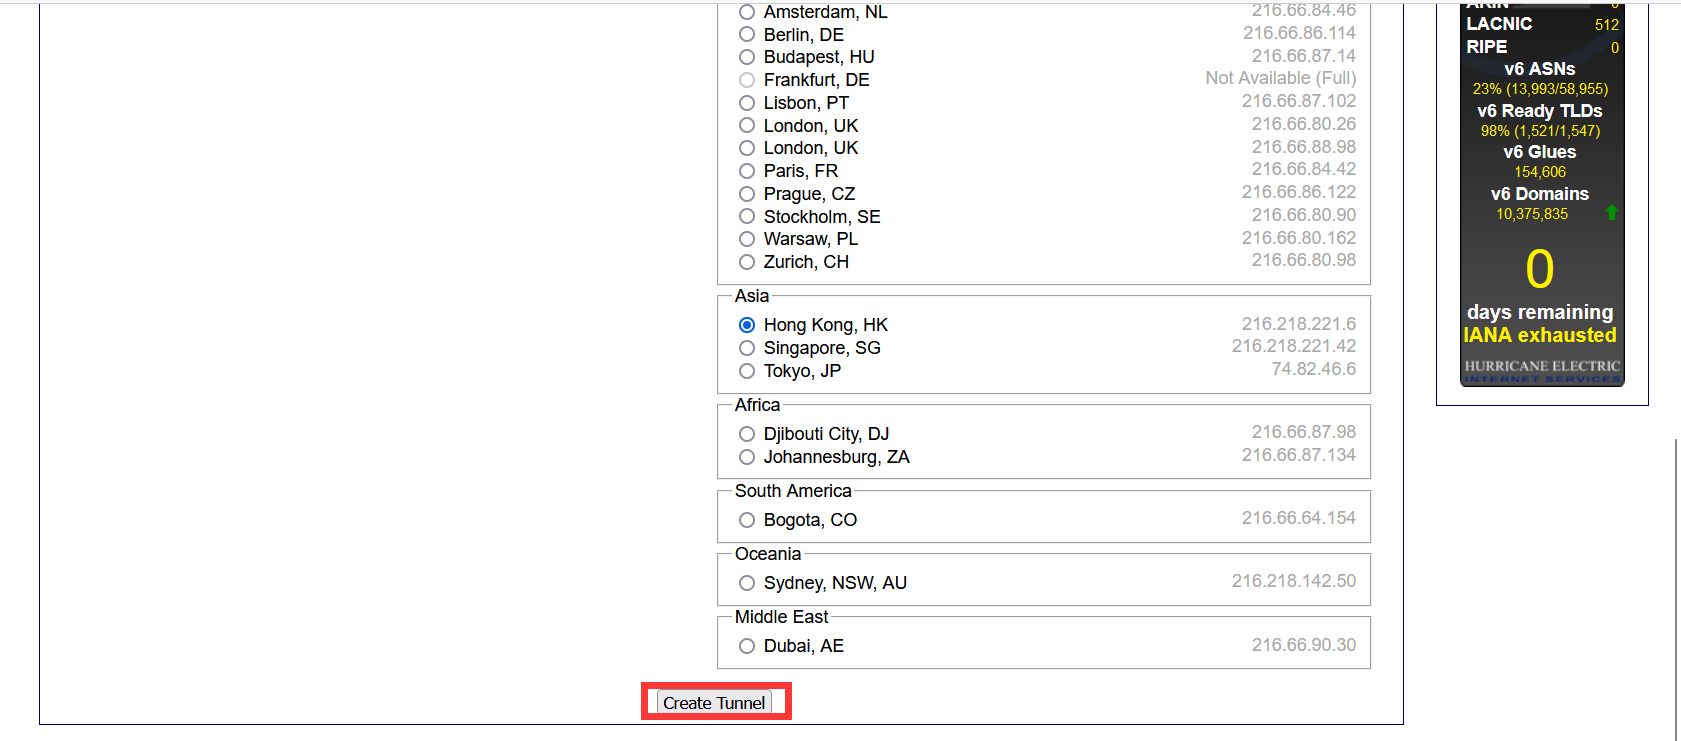
- Fill in your server's IPv4 address in the red box, choose a connection point that is physically close to your server, for example, if your machine is in Los Angeles, choose a connection point on the west coast of the United States, and then click
Create Tunnelto create the tunnel when you are prompted by the green box!
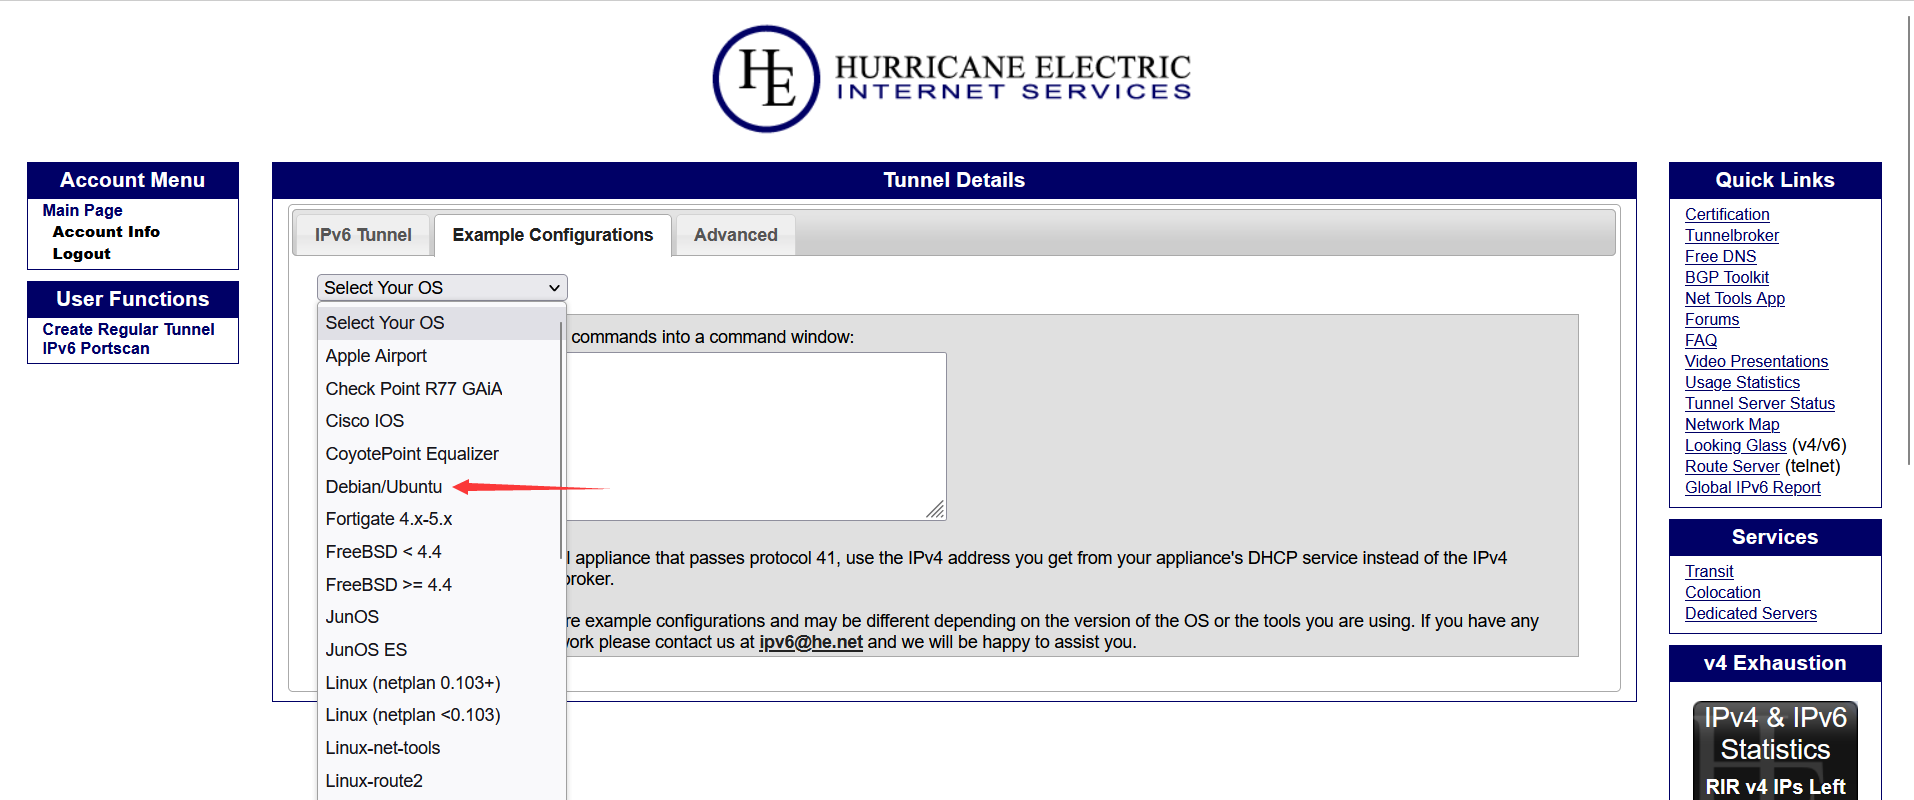
- Wait for the following screen, click
Example Configurationsand select the corresponding system, for example, the host of LXD is definitely Debian/Ubuntu.
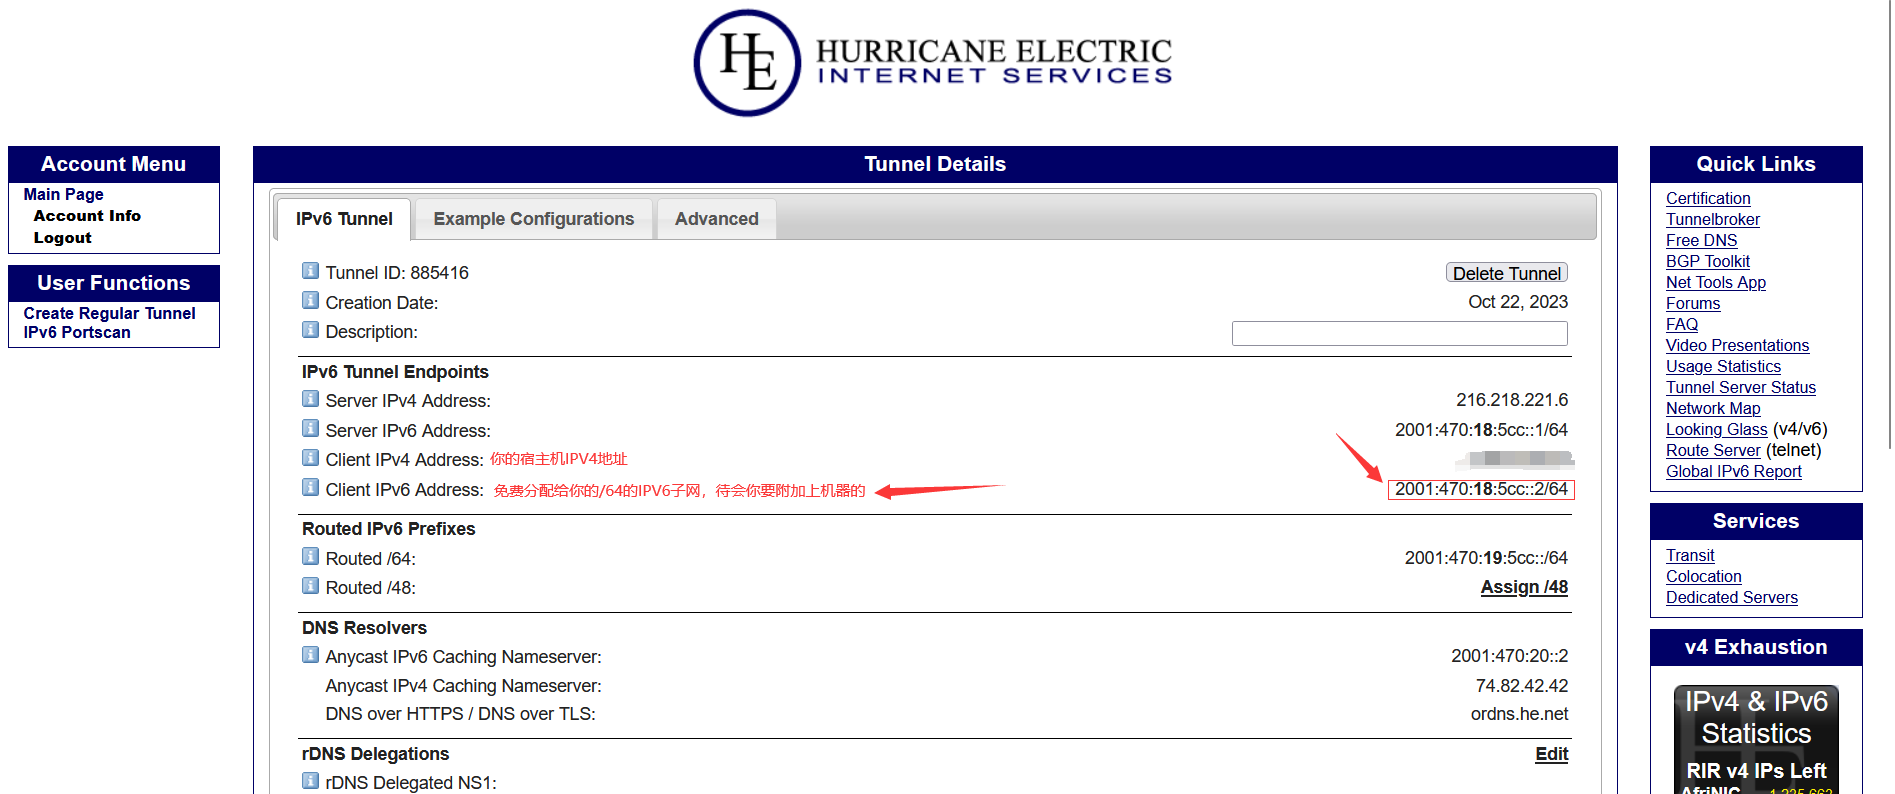
- The boxed part is the file to be modified and the content to be filled in.
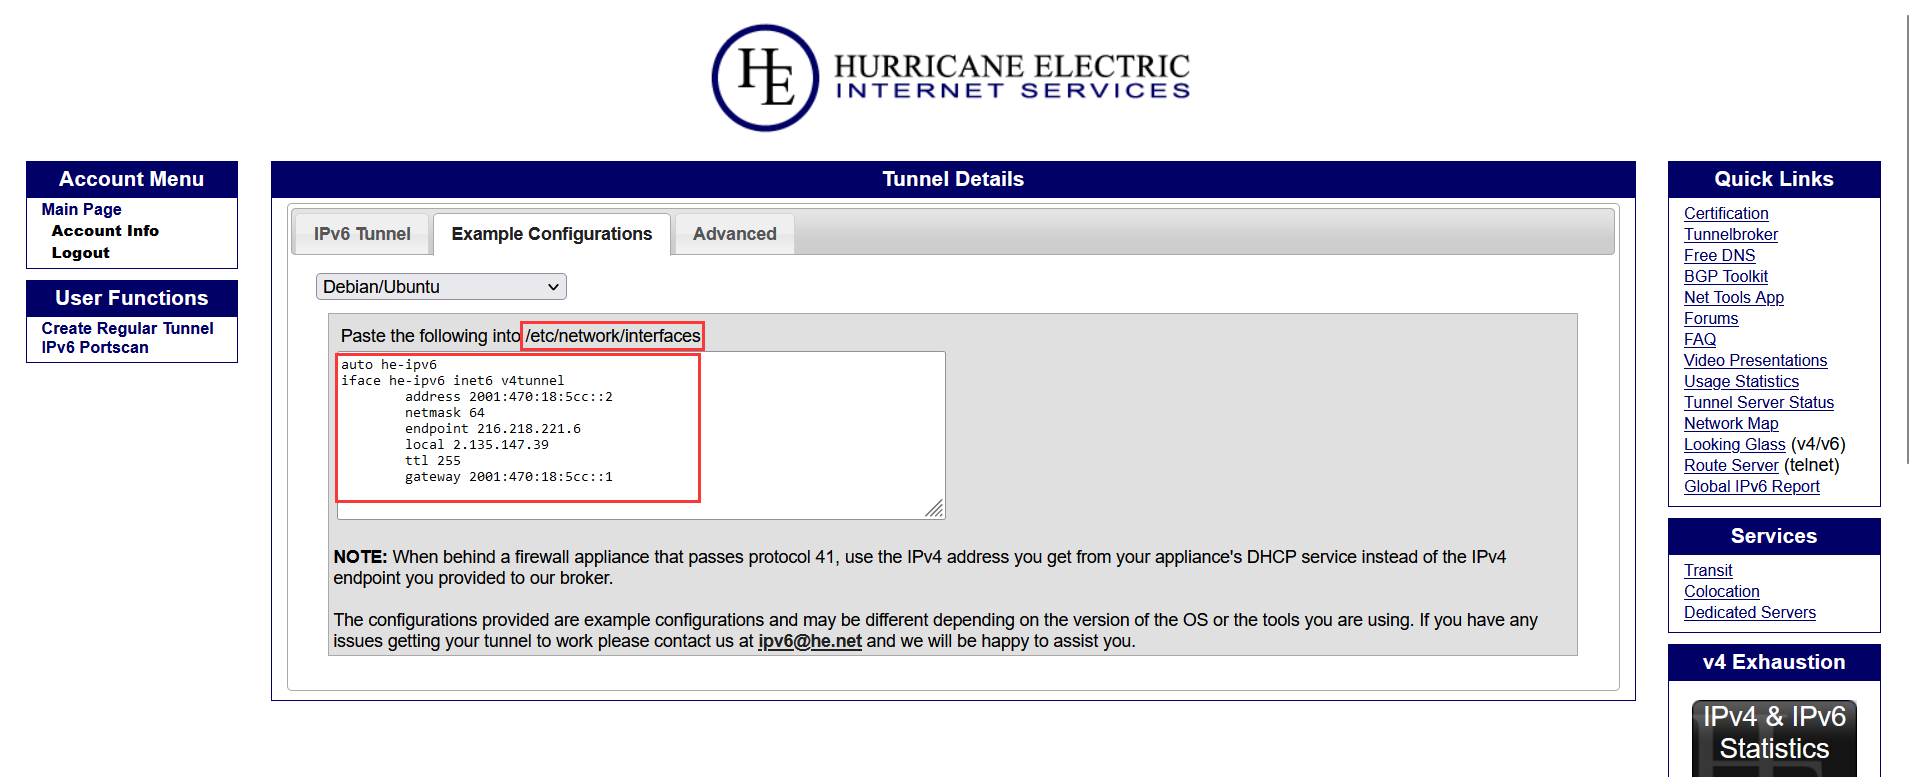
- Exchange the format of the command then add IPv6 settings to your network configuration file.
Then open https://ipv6tunnel.spiritlhl.top/ and selectOptionforTunnelBrokerNet, another drop-down selection box to choose the name of the package you successfully installed previously, then paste what you copied in the input box.
Then click Convert to convert the format, and wait for the page to refresh to show the converted configuration file.
Then use vim or vi to modify the/etc/network/interfacesfile to add content, or modify the following command to add new content
tee -a /etc/network/interfaces <<EOF
# Here, copy and paste the contents of the configuration file in the red box, and then run this command.
EOFThen you can usecat /etc/network/interfacesto see if the configuration file is written correctly.
- If all of the above is OK, then you need to enable the network interfaces
apt-get install net-tools iproute2 -y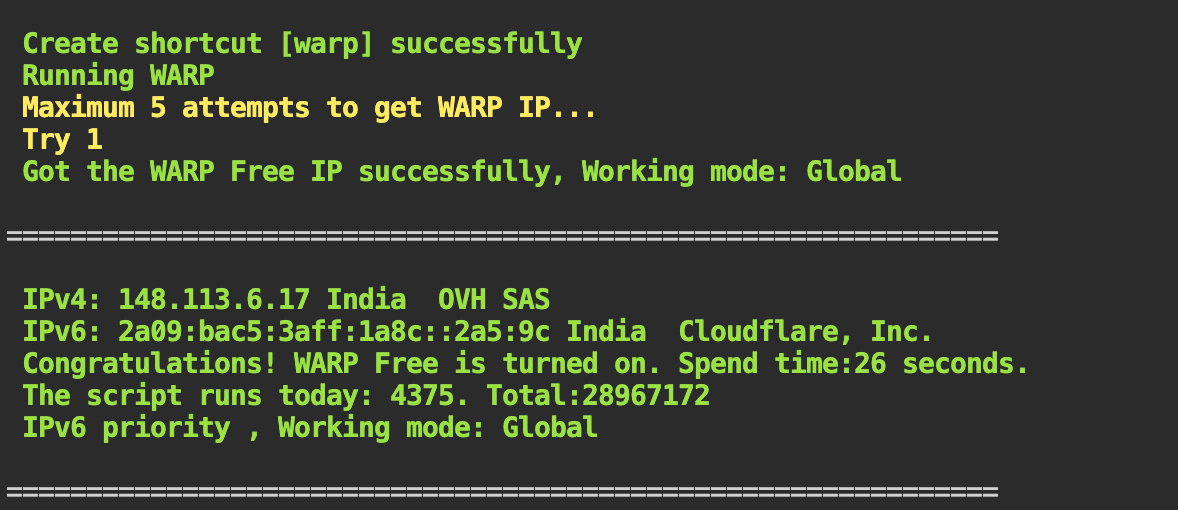
systemctl restart networking- Then you can test the IP address of the network interface.
Execute theifconfigcommand, and there should be a he-ipv6 interface, similar to the following:
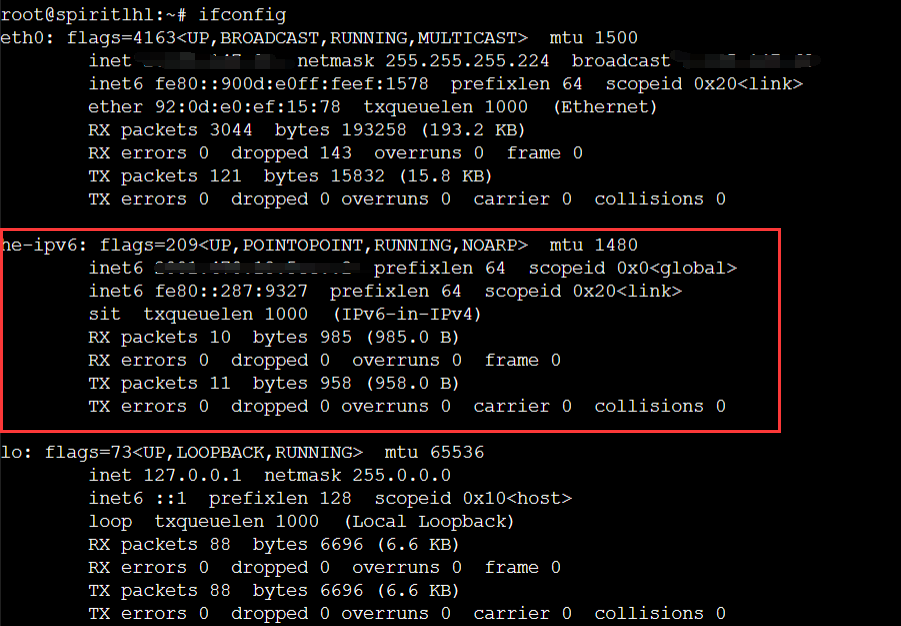
Or execute:
curl ipv6.ip.sbReturns the IPv6 address you bound to
- Additional settings for NAT VPS
IPv4 NAT VPS may require some additional settings beyond the IP replacement operation mentioned earlier, otherwise it may still not be able to access the IPv6 network.
apt-get install ufw -y
ufw allow 41Add the relevant routing rules
route -A inet6 add ::/0 dev he-ipv6- If the IPv6 network is no longer needed and you want to delete it, delete the he-ipv6 network interface configuration.
If you want to delete the he-ipv6 network interface configuration (if not, it will be enabled automatically after reboot), remember to modify the/etc/network/interfacesfile to remove the content added in the red box before.
Then reboot the server to remove the
tunnelbroker_ch
Similar to the above, first register an account at https://www.tunnelbroker.ch/ and click on the activation email after registering.
Then you have to fill in the IPv4 address of your server.

After creating an account, you need to go to the Config page instead of the details page.
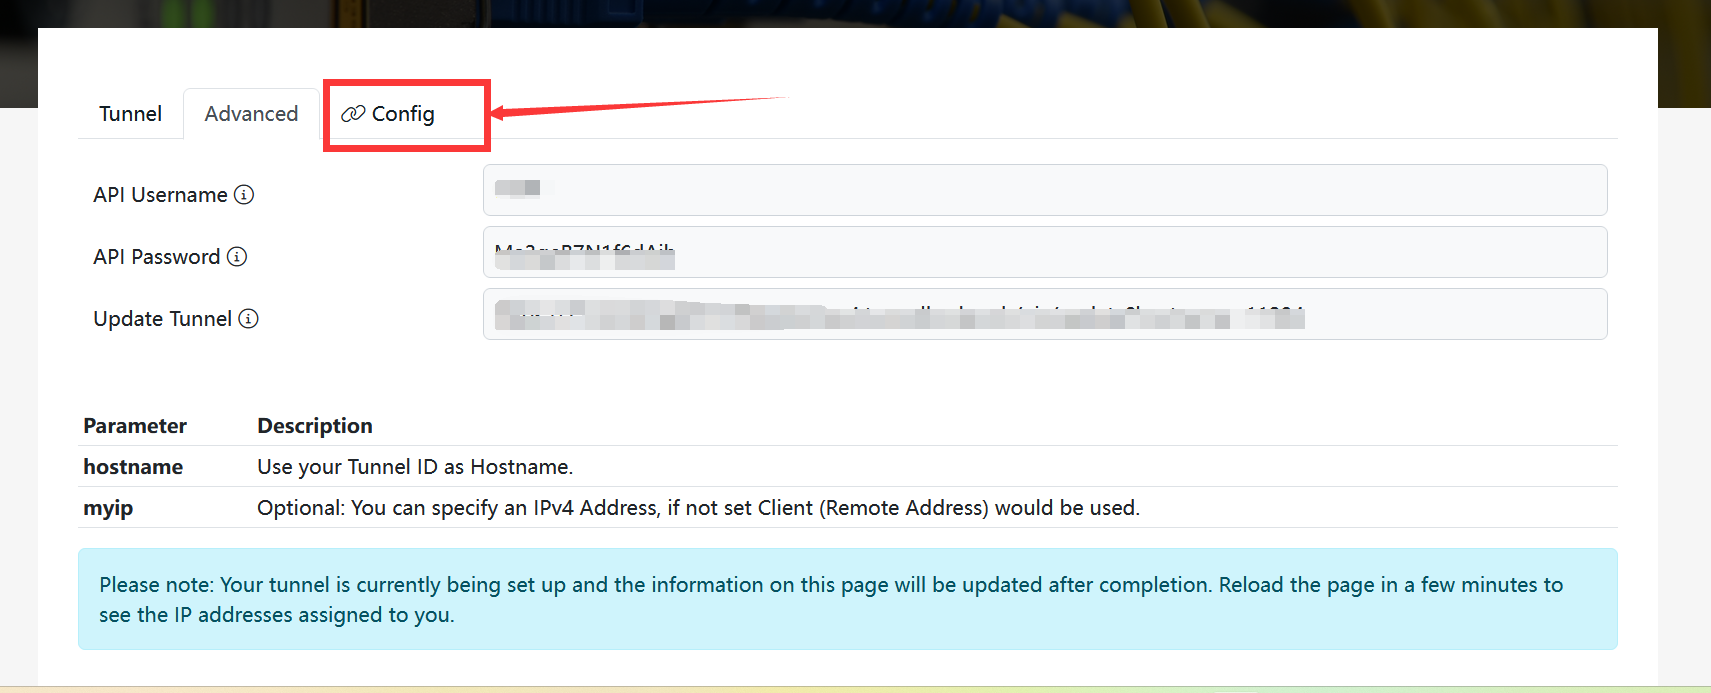
Don't use the following page, first refresh the page without the light blue box and then stop refreshing it
Don't stop refreshing after the light blue box pops up
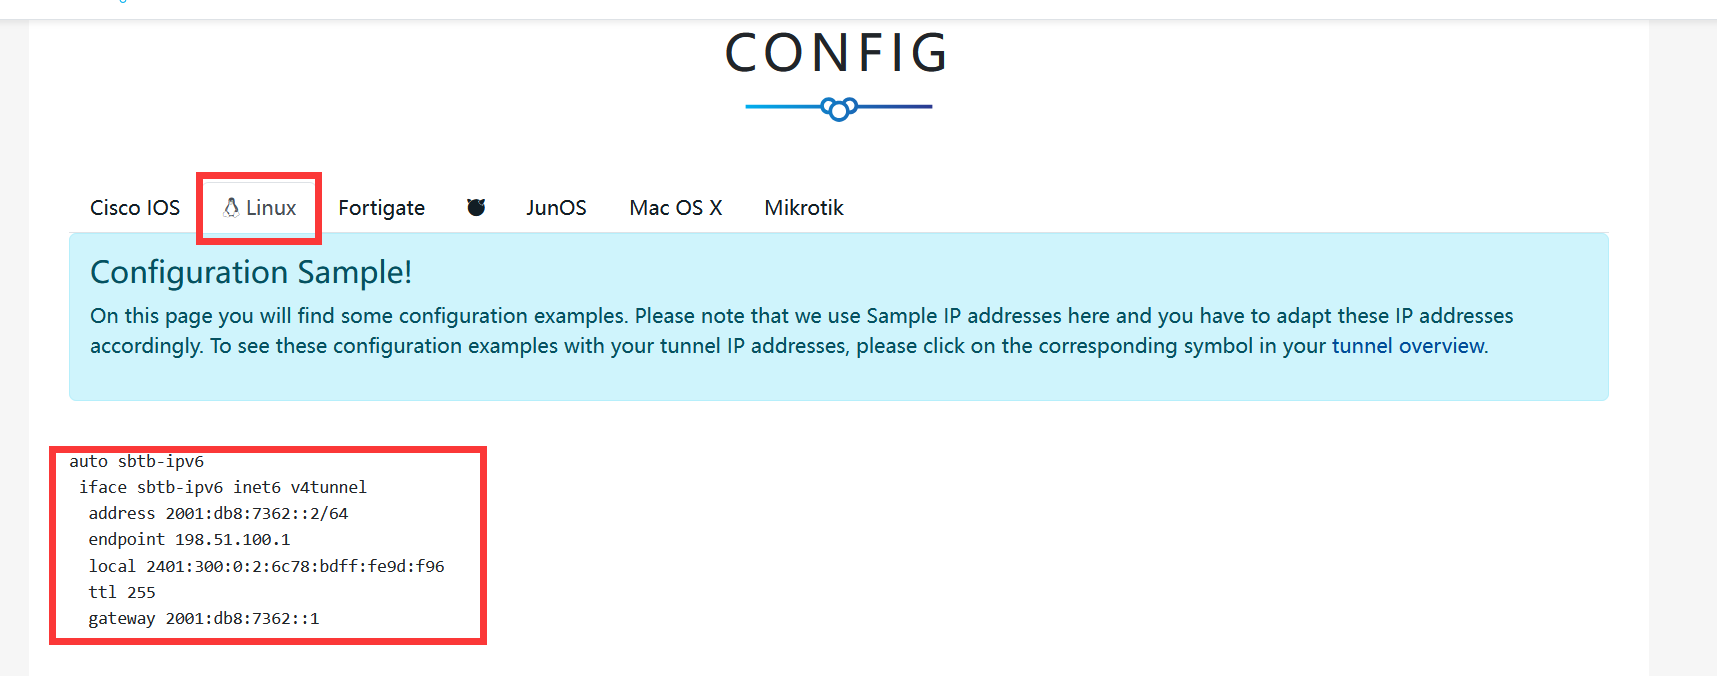
Record the content of the last red box on the following page, and prepare to modify the host configuration file.
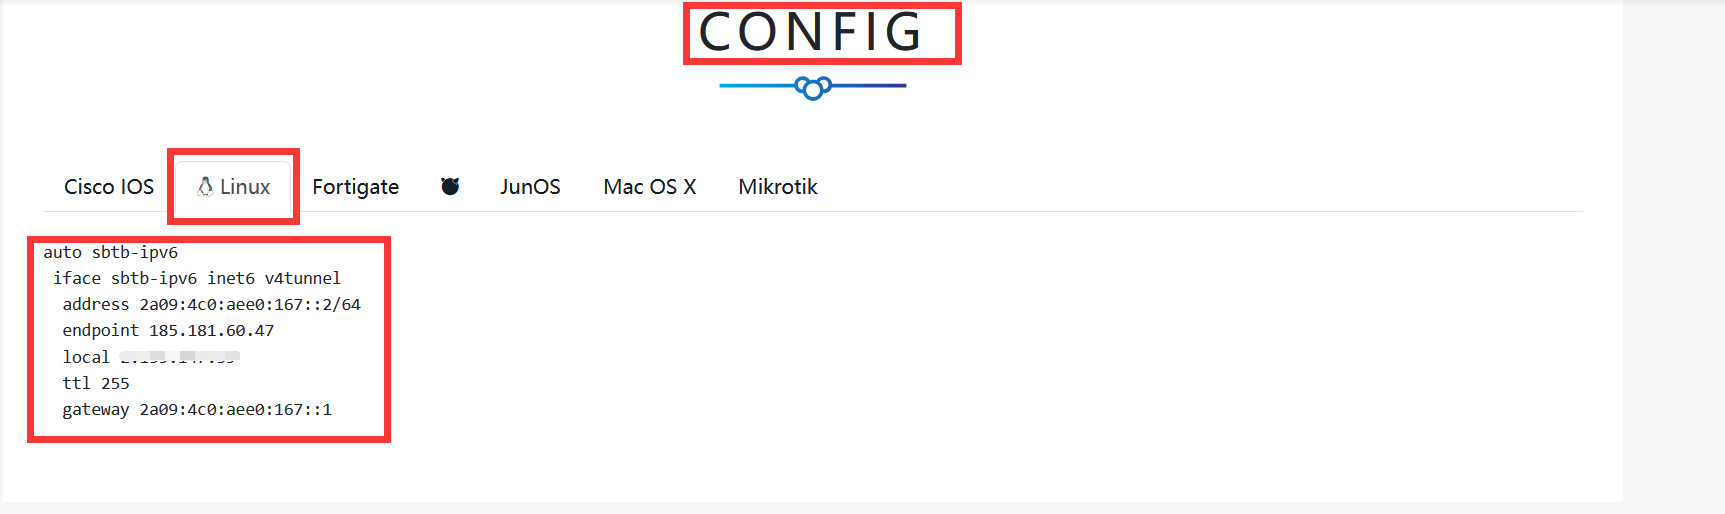
Copy the last red box of the page without the blank lines.
Then open https://ipv6tunnel.spiritlhl.top/ and selectOptionforTunnelBrokerCh, another drop-down selection box to choose the name of the package you successfully installed previously, then paste what you copied in the input box.
Then click Convert to convert the format, and wait for the page to refresh to show the converted configuration file.
Then use vim or vi to modify the/etc/network/interfacesfile to add content, or modify the following command to add new content
tee -a /etc/network/interfaces <<EOF
# Modify the
EOFThen you'll need to reboot the system a bit, or run
apt-get install net-tools iproute2 -y
systemctl restart networkingMake sure the environment is OK before you do anything else
ip4market_ru
Similar to the above, first register an account at https://tb.ip4market.ru, the registered email address must be an unseen email address, the phone number can be written randomly without verification, and the IP address should be the IPv4 address of the host you want to attach.
The IP address is the IPv4 address of the host computer you are attaching to
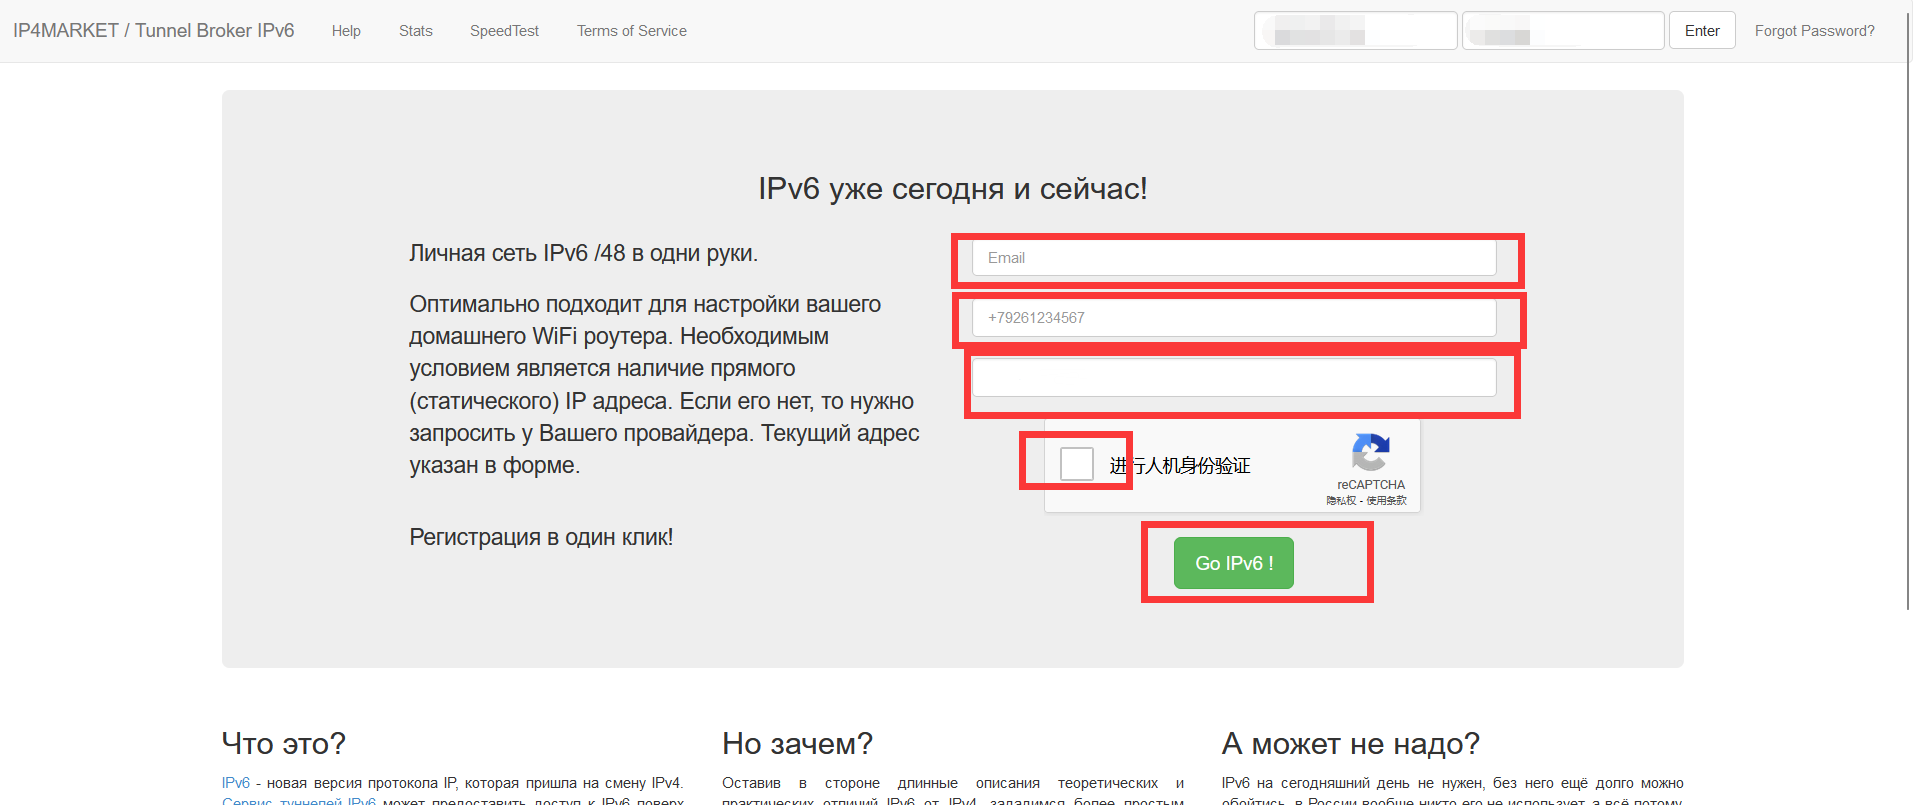
Then you have to go through Recaptcha's human-machine verification, and click register.
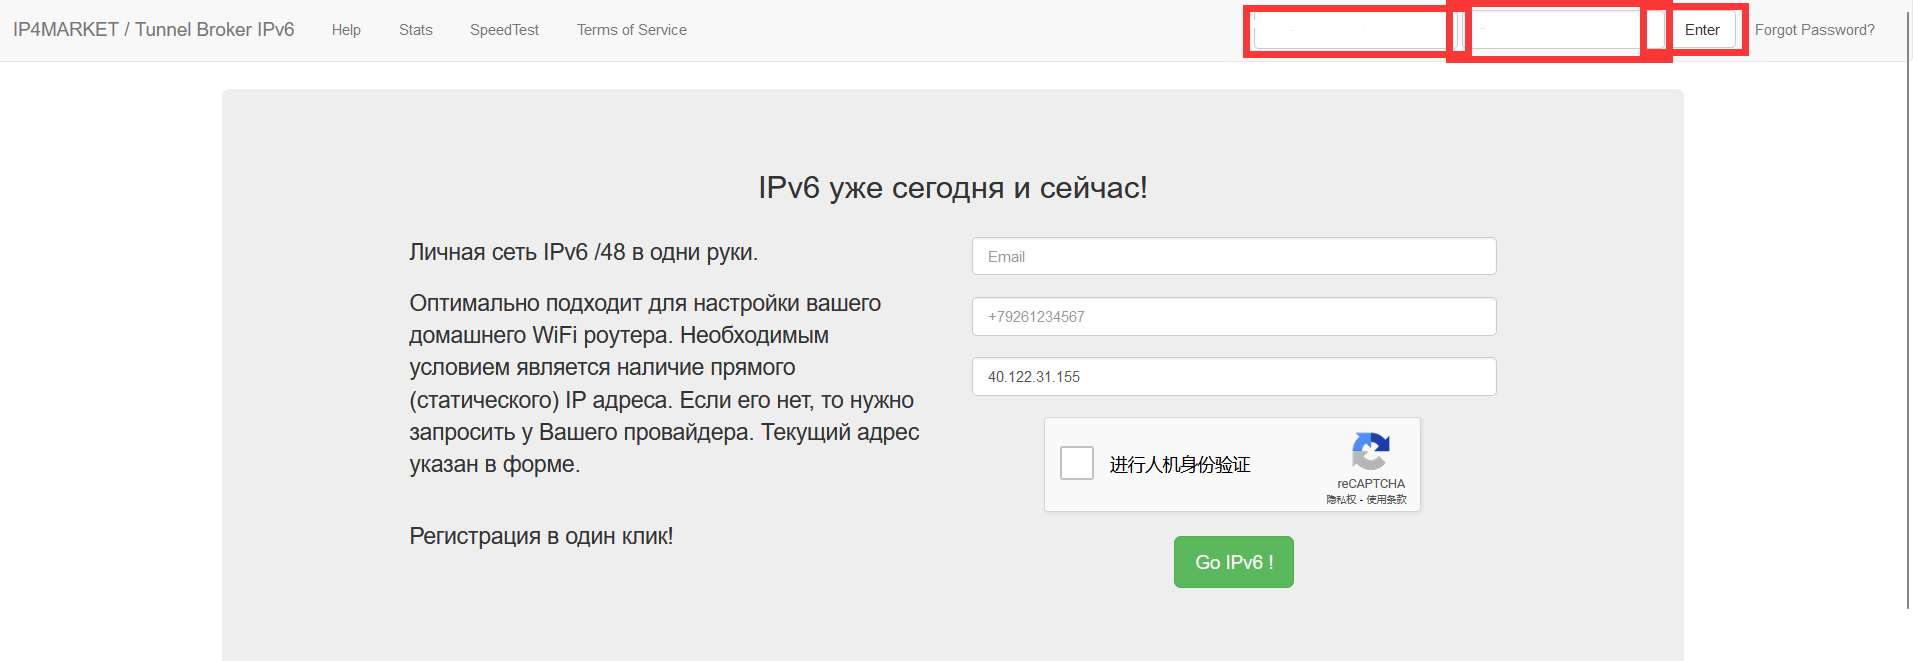
You will receive an activation email with your password, memorize it.
Then login on the homepage
Then you will be taken to this page
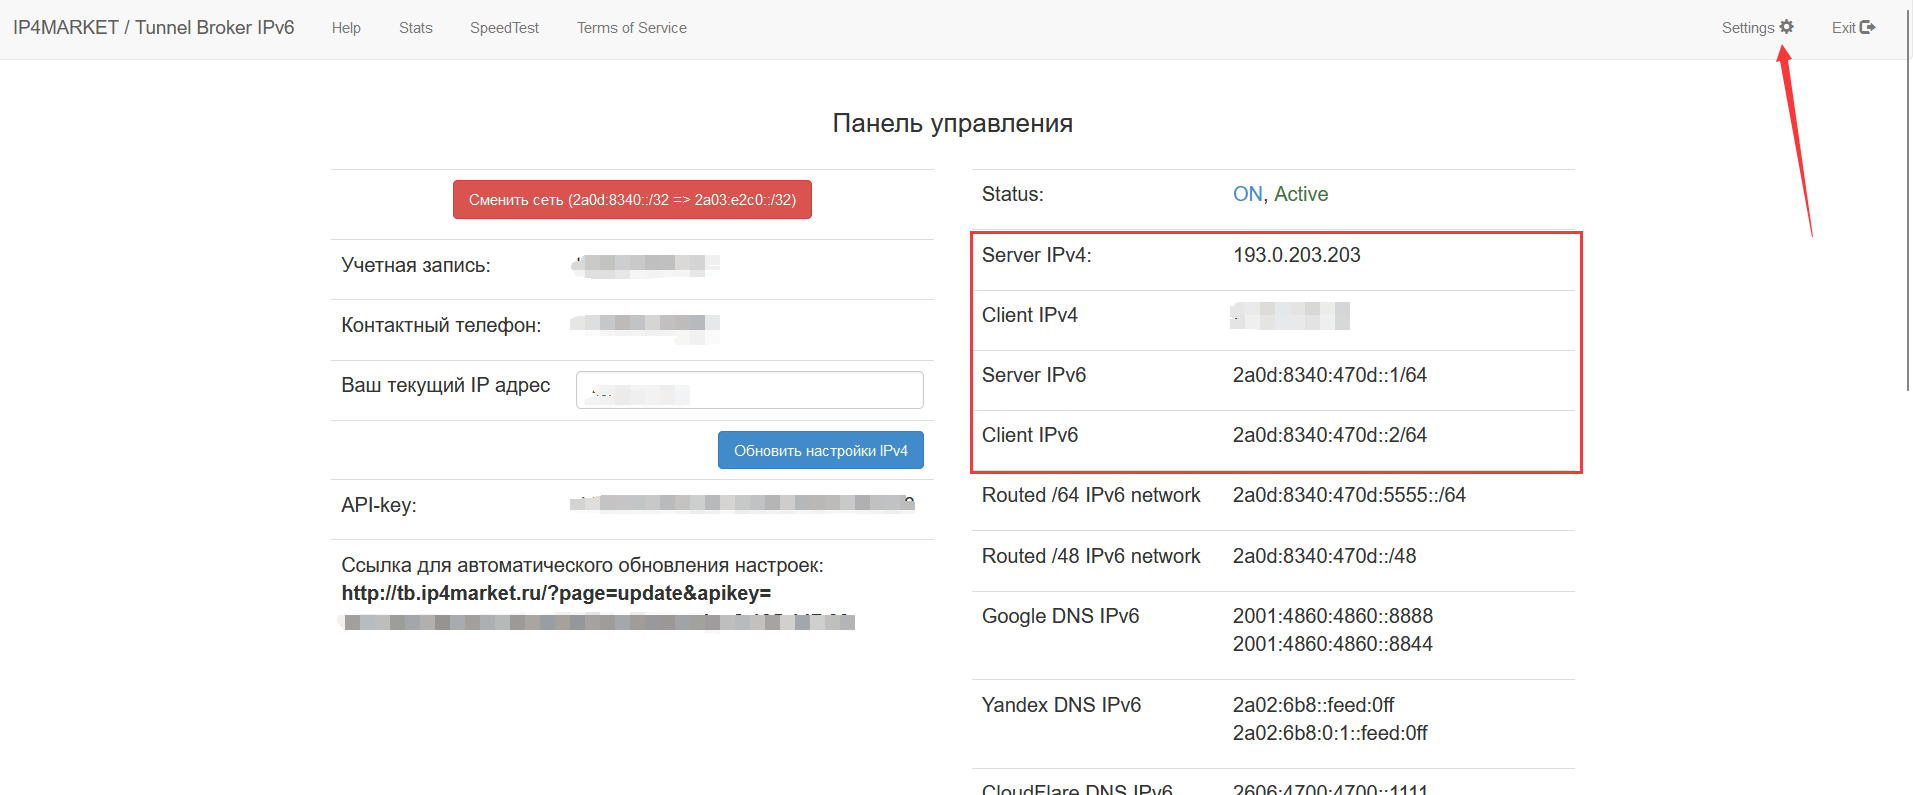
Hold down the right button and copy the four lines framed in red, which are
Server IPv4.
Client IPv4
Server IPv6
Client IPv6For these four lines, press ctrl+c to copy or right-click to copy

Then open https://ipv6tunnel.spiritlhl.top/ and selectOptionforip4market, another drop-down selection box to choose the name of the package you successfully installed previously, then paste what you copied in the input box.
Then click Convert to convert the formatting
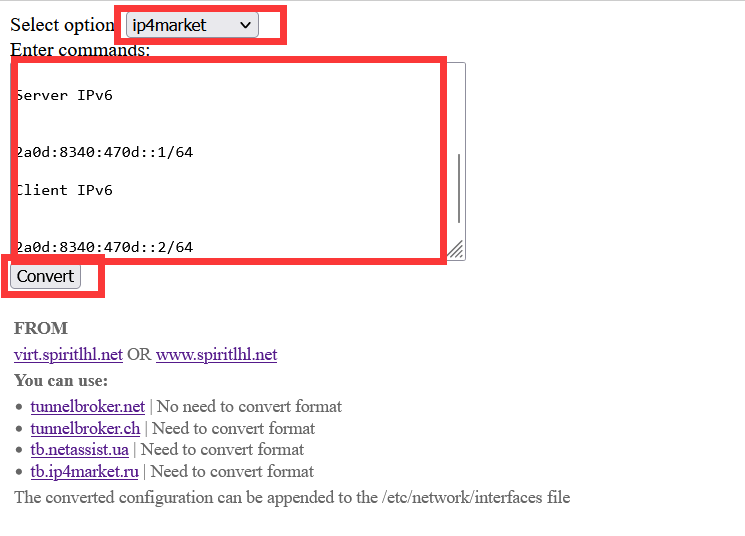
Then the page will be refreshed automatically and you need to modify the contents of the/etc/network/interfacesfile with vim or vi commands, or modify the following commands to add new contents.
tee -a /etc/network/interfaces <<EOF
# Modify the
EOFThen you'll need to reboot the system a bit, or run
apt-get install net-tools iproute2 -y
systemctl restart networkingMake sure the environment is OK before you do anything else
netassist_ua
Similar to the above operation, first in https://tb.netassist.ua/ register an account first, after registration, click on the activation of the mail, the activation page will have a password display, remember to record!
Then fill in the IPv4 address of your server, you can change it later, just fill in a random one first.
Then you will get to this page
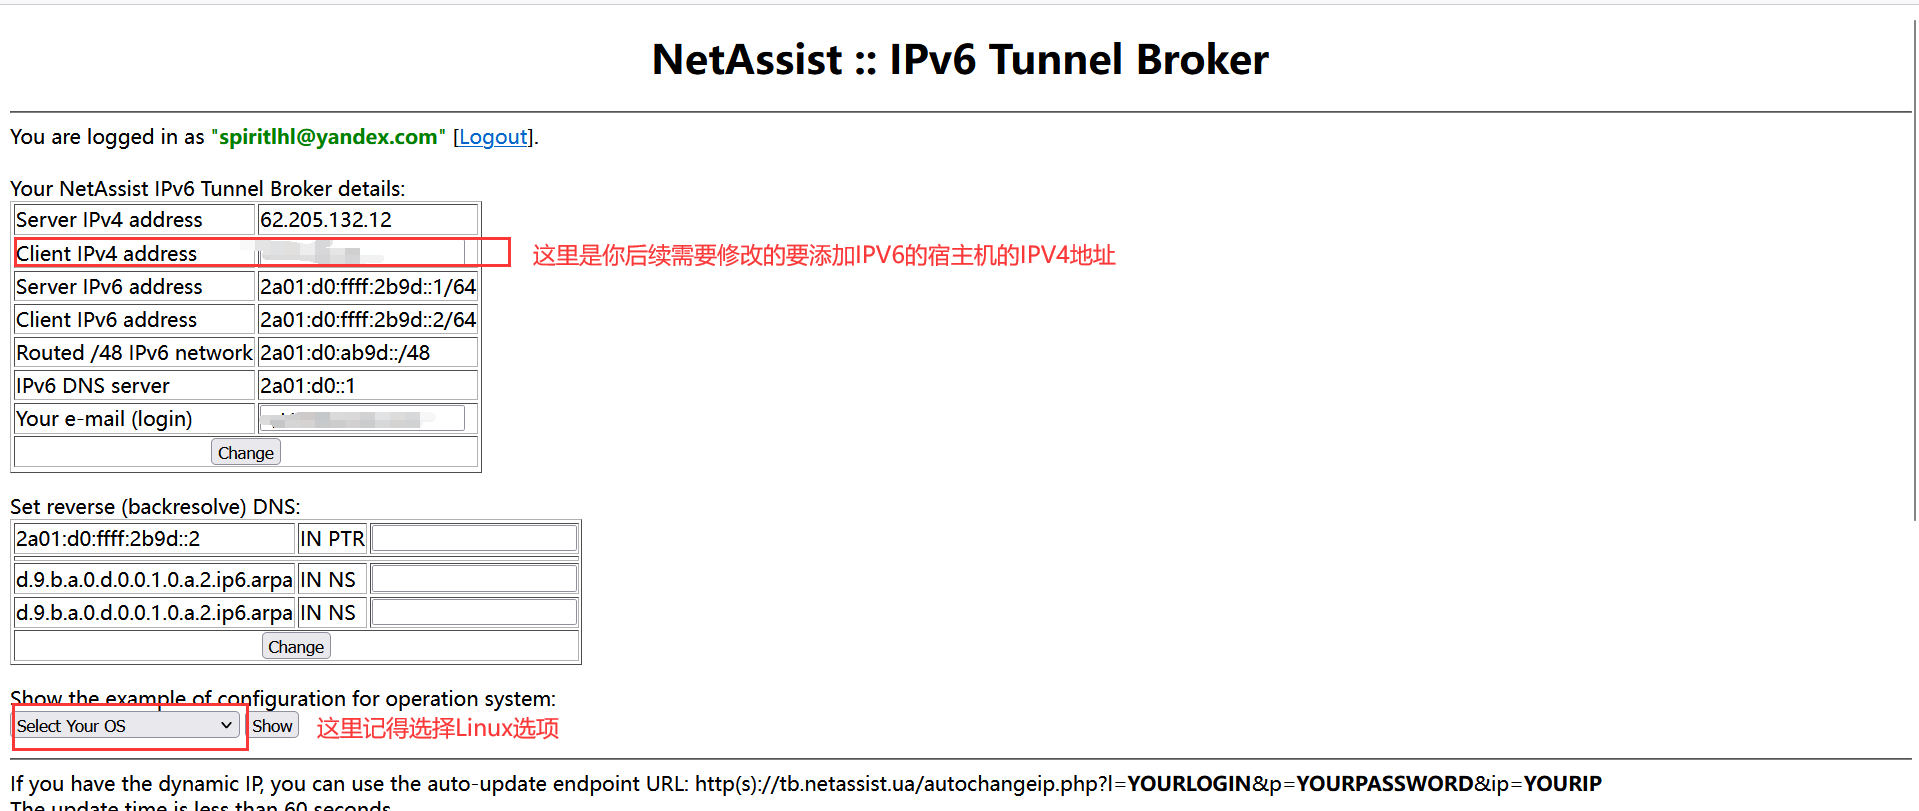
The first red box is the location of your host's IPv4 address, if you want to modify it, modify it there, and then click change to save.
The second red box is for```Linux``, and then click on show

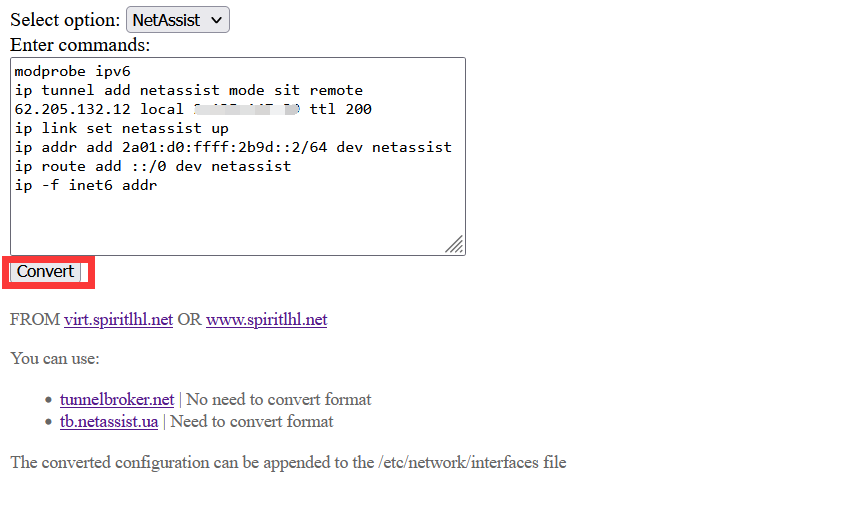
The above content will appear, copy all the boxed parts without blank lines.
Then open https://ipv6tunnel.spiritlhl.top/ and selectOptionforNetAssist, another drop-down selection box to choose the name of the package you successfully installed previously, then paste what you copied in the input box.
Then click Convert to convert the formatting
Then the page will be refreshed automatically and you need to modify the contents of the/etc/network/interfacesfile with vim or vi commands, or modify the following commands to add new contents.
tee -a /etc/network/interfaces <<EOF
# Modify the
EOFThen you'll need to reboot the system a bit, or run
apt-get install net-tools iproute2 -y
systemctl restart networkingMake sure the environment is OK before you do anything else
Transfer IPv6 subnets between different servers
Related repository: https://github.com/oneclickvirt/6in4
This method will provide a way to split a /80 out of the IPv6 segment on A and attach it to B to use.
Features
- Self-built IPv6 tunnel for sit/gre/ipip protocols
- Support to customize the IPv6 subnet size to be cut out, and the appropriate IPv6 subnet information in CIDR format will be calculated automatically.
- Automatically recognizes the IPv6 subnet size of the server side
- will automatically set up the tunnel server and print the commands that the client needs to execute
- Setting up the IPv6 tunnel is easy to understand and easy to remove
Environmental Preparation
| VPS(A) | VPS(B) |
|---|---|
| one IPv4 address (server_ipv4) | one IPv4 address (clinet_ipv4) |
| one IPv6 subnet | no IPv6 address |
| Hereafter referred to as server | Hereafter referred to as client |
Usage
Download Script
curl -L https://raw.githubusercontent.com/oneclickvirt/6in4/main/6in4.sh -o 6in4.sh && chmod +x 6in4.shExecute it
./6in4.sh client_ipv4 <mode_type> <subnet_size>| Options | Optional Option 1 | Optional Option 2 | Optional Option 3 |
|---|---|---|---|
| <mode_type> | gre | sit | ipip |
| <subnet_size> | 64 | 80 | 112 |
<mode_type> only support those three protocols for now, the more advanced the more recommended, no fill in the default is sit protocol
<subnet_size> as long as it is larger than the original system subnet mask, and is a multiple of 8, if you don't fill it in, it defaults to 80.
Remember to replace client_ipv4 with the IPv4 address of the machine you want to attach IPv6 to, and the command you need to execute on the client side will be sent back to you after execution, see the instructions after execution for details.
To prevent you from forgetting to copy the commands, the commands themselves will be written to the 6in4.log file under the current path, you can use cat 6in4.log to query the commands that need to be executed on the client side
For copied commands, be sure to select option 6in4 in https://ipv6tunnel.spiritlhl.top/ before converting!
Then the page will be refreshed automatically and you need to modify the contents of the/etc/network/interfacesfile with vim or vi commands, or modify the following commands to add new contents.
tee -a /etc/network/interfaces <<EOF
# Modify here
EOFThen you'll need to reboot the system a bit, or run
apt-get install net-tools iproute2 -y
systemctl restart networkingMake sure the environment is OK before you do anything else
Check server status
systemctl status ndpresponderip addr showCheck client status
ip addr showcurl ipv6.ip.sbDelete tunnel
server
ip link set server-ipv6 down
ip tunnel del server-ipv6client
ip link set user-ipv6 down
ip tunnel del user-ipv6The above deletion is only temporary, for permanent deletion you must modify and delete the contents of the /etc/network/interfaces file that you have previously added.
one more thing
In fact https://tunnelbroker.net/ supports the application of IPv6 subnets of size /48
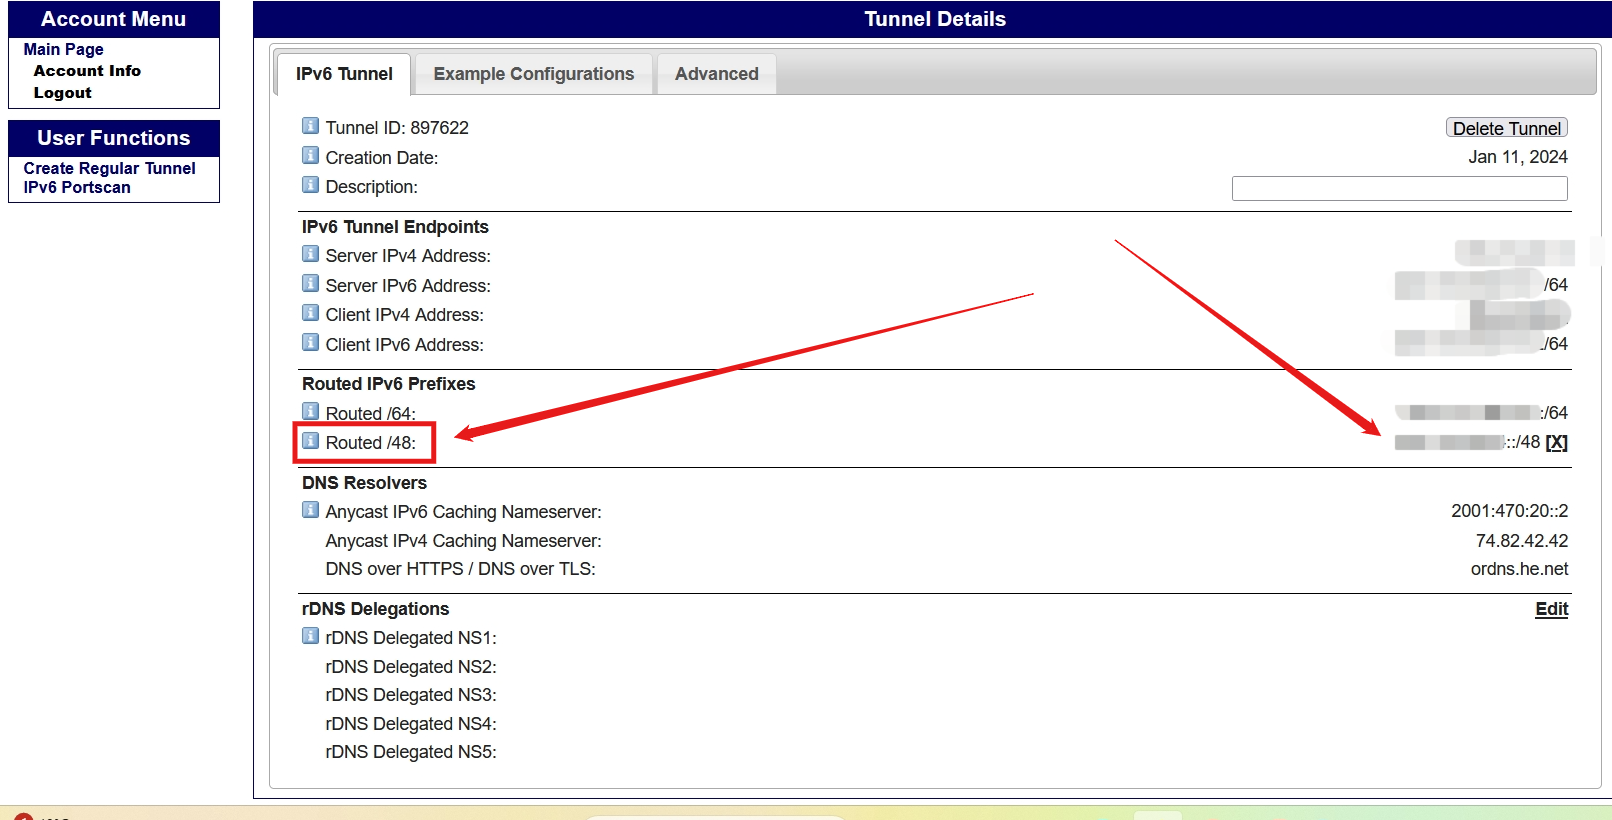
Make the request here, then when converting the format change the original /64 IPv6 address to a /48 IPv6 address and you'll get a larger IPv6 subnet!
Supplemental CloudFlare WARP IPv4 / IPv6 outbound
1: Benefits
- By installing it on the host machine, all enabled machines can benefit from the advantages of Warp without the need for individual configurations, thus saving resources and simplifying management.
- The use of kernel WireGuard on the host machine enables more efficient operation of WireGuard compared to user-space WireGuard-Go.
2: Manual Installation
2-1 Installing WireGuard Dependencies
- Debian and Ubuntu systems
# Update dependent libraries
apt update -y

# Install WireGuard runtime dependencies
apt install -y --no-install-recommends net-tools openresolv dnsutils

# Install WireGuard protocol-compatible toolset
apt install -y --no-install-recommends wireguard-tools- CentOS systems
# Update dependent libraries
yum update -y

# Install additional package components
yum install -y epel-release

# Install WireGuard runtime dependencies
yum install -y net-tools

# Install WireGuard protocol-compatible toolset
yum install -y wireguard-tools2-2 Getting warp account information
Visit https://warp.cloudflare.now.cc/?run=register&format=yaml and record private_key, v6 2 values
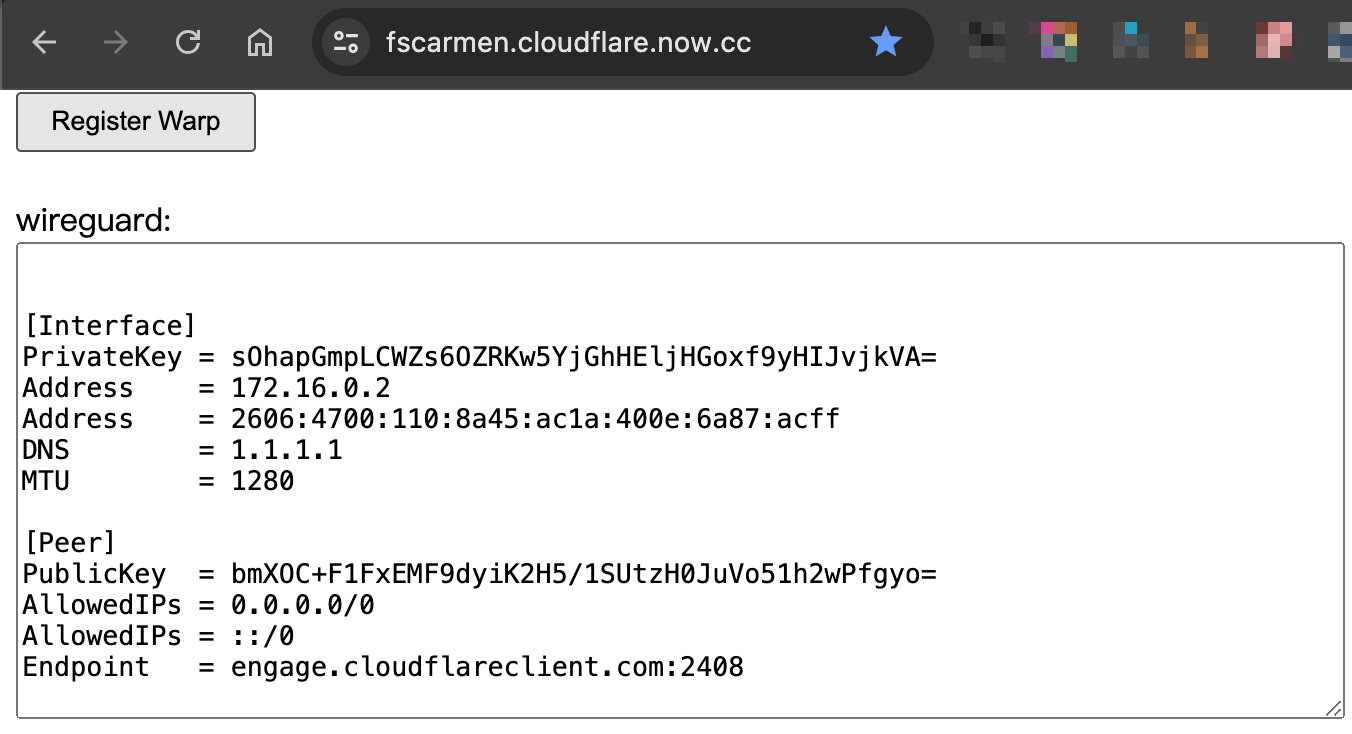
2-3: Modifying Configuration Files
Create and edit the /etc/wireguard/warp.conf file, replacing any parts that contain <> (pointy brackets) together, just to make it look obvious.
For IPv4-only hosts, Warp takes over IPv6 egress only
[Interface]
PrivateKey = <Your PrivateKey>
Address = 172.16.0.2/32
Address = <Your Address-v6 >/128
DNS = 1.1.1.1, 1.0.0.1, 2606:4700:4700::1111, 2606:4700:4700::1001
MTU = 1280

[Peer]
PublicKey = bmXOC+F1FxEMF9dyiK2H5/1SUtzH0JuVo51h2wPfgyo=
AllowedIPs = ::/0
Endpoint = 162.159.193.10:2408- For IPv6 only hosts, Warp takes over IPv4 egress only.
[Interface]
PrivateKey = <Your PrivateKey>
Address = 172.16.0.2/32
Address = <Your Address-v6>/128
DNS = 2606:4700:4700::1111, 2606:4700:4700::1001, 1.1.1.1, 1.0.0.1
MTU = 1280

[Peer]
PublicKey = bmXOC+F1FxEMF9dyiK2H5/1SUtzH0JuVo51h2wPfgyo=
AllowedIPs = 0.0.0.0/0
Endpoint = [2606:4700:d0::a29f:c101]:2408- There's no need to target dual-stack, after all, native network outlets are better than relaying through Warp
2-4: Setting the Address Resolution Priority
For IPv4-only host machines, Warp only takes control of the IPv6 outbound, prioritizing the use of the native network's IPv4 outbound.
# IPv4 priority
grep -qE '^[ ]*precedence[ ]*::ffff:0:0/96[ ]*100' /etc/gai.conf || echo 'precedence ::ffff:0:0/96 100' >> /etc/gai.confFor IPv6-only host machines, Warp only takes control of the IPv4 outbound, prioritizing the use of the native network's IPv6 outbound.
# IPv6 priority
sed -i '/^precedence \:\:ffff\:0\:0/d;/^label 2002\:\:\/16/d' /etc/gai.conf2-5: Connecting to Warp and setting up the systemd process daemon
# Run wireguard to connect to Warp. If this step gets stuck and causes the connection to be lost, reboot the host in the background to resolve it.
wg-quick up warp

# Check IPv4
curl -A a https://api-ipv4.ip.sb/geoip

# Check IPv6
curl -A a https://api-ipv6.ip.sb/geoip

# Disconnect from Warp after successful test.
wg-quick down warp

# Reconnect and set process daemon to take effect automatically after reboot.
systemctl enable --now wg-quick@warp3: Autorun: fscarmen's one-click scripts
Finally, the one-click script for fscarmen is introduced. The script is mentioned as a handy tool to simplify the configuration process. It also automatically handles advanced parameters such as Optimal MTU, Optimal Endpoint, etc.
Project: https://github.com/fscarmen/warp-sh
# Run one-key script
curl -sSLO https://gitlab.com/fscarmen/warp/-/raw/main/menu.sh && bash menu.sh