
OneClickVirt Advanced Installation
Choose one installation page
Read either this page or Basic Installation, then choose one method from that page's table. Do not run multiple installation methods for the same panel.
Advanced installation is intended for users who already use 1Panel, need an external database or custom reverse proxy, want to manage release binaries themselves, or need source builds. Controlled-node requirements are the same as for basic installation; read Configuration Requirements first.
Panel Update Capability Boundaries
See Automatic MySQL / MariaDB Compatibility for engine labels, historical configuration sections, environment overrides and safe repair boundaries. External databases are detected from the server, not the controller architecture.
Super administrators can open Manage updates from the controller page footer. Direct panel update, rollback, and restart are available only for Linux root deployments using a controlled systemd service with the controller and Web paths inside the installation root. The panel verifies each Release's SHA256SUMS and keeps up to five local backups before switching files.
The 1Panel, Docker, Docker Compose, source, manually started all-in-one, and Windows deployments listed on this page are upgraded by their own container, orchestrator, or process manager. The panel never rewrites them; it only displays copyable commands. Rollback replaces application and Web assets but does not automatically reverse database migrations, so back up the database and application data first.
For Release or GitHub API access through a CDN or reverse proxy, configure ONECLICKVIRT_UPDATE_PROXY, ONECLICKVIRT_UPDATE_API_ENDPOINTS, and ONECLICKVIRT_PROXY_SERVICES in the controlled systemd service. Set ONECLICKVIRT_UPDATE_ENABLED=false to disable panel operations completely. Older Releases without SHA256SUMS can still be handled manually with the existing install.sh upgrade path.
Methods on This Page
The table contains only methods documented on this page, ordered from easiest to most involved.
| Difficulty | Method | Best for | Main requirement |
|---|---|---|---|
| Easy | 1Panel third-party app store | Existing 1Panel users | Import and manage the third-party local app store |
| Easy to moderate | Precompiled all-in-one binary | Users who want to manage one program file | Provide a database and manage the process |
| Moderate | Precompiled separate frontend/backend | Higher performance or a custom frontend path | Provide a database and reverse proxy |
| Moderate | Docker external-database image | Existing external MySQL/MariaDB | Docker and an external database |
| Advanced | Docker Compose source build | Modified source with a multi-container deployment | Git, Docker Compose, and build time |
| Advanced | Dockerfile source build | Full control of image builds and runtime options | Maintain images, containers, and volumes |
1Panel Third-Party App Store
okxlin/appstore includes OneClickVirt. It is an unofficial application configuration collection for 1Panel 2.0. Treat the README on its localApps branch as the source of truth for importing the store.
When 1Panel uses its default /opt/1panel path, run the upstream synchronization commands in a terminal or a 1Panel Shell scheduled task:
git clone -b localApps https://github.com/okxlin/appstore /opt/1panel/resource/apps/local/appstore-localApps
cp -rf /opt/1panel/resource/apps/local/appstore-localApps/apps/* /opt/1panel/resource/apps/local/
rm -rf /opt/1panel/resource/apps/local/appstore-localAppsRefresh the local app store, search for oneclickvirt, and complete its form. Adjust the paths if 1Panel is installed somewhere other than /opt/1panel.
Upgrade
Run the upstream synchronization commands again and refresh the local app list, then upgrade OneClickVirt from 1Panel's installed-applications page. Create an application backup in 1Panel first.
View Logs
Open the OneClickVirt container logs from 1Panel's installed-applications page. You can also enter the application's Compose directory and run:
docker compose logs -f --tail 200Uninstall
Uninstall OneClickVirt from 1Panel's installed-applications page. Whether persistent data is also removed depends on the data-removal option in the uninstall dialog. Leave that option disabled when the data must remain available for recovery.
WARNING
Button labels can differ between 1Panel versions. Create a restorable application backup and confirm how the data directory will be handled before uninstalling.
Precompiled Binary Installation
Two methods are distinguished here:
- Frontend-backend separated deployment (backend and frontend are compiled separately into corresponding files for deployment), better performance
- All-in-one deployment (frontend and backend combined into one file for deployment), relatively poorer performance
Frontend-Backend Separated Deployment
Linux
Download Script
curl -L https://raw.githubusercontent.com/oneclickvirt/oneclickvirt/refs/heads/main/scripts/install.sh -o install.sh && chmod +x install.shEnvironment Installation
Interactive environment installation
./install.sh envNon-interactive environment installation (use export noninteractive=true to enable non-interactive mode)
export noninteractive=true && ./install.sh envMain Installation
./install.sh installInstallation directory: /opt/oneclickvirt
After successful installation, you need to manually start the service:
systemctl start oneclickvirtOther usage methods:
Stop service:
systemctl stop oneclickvirtEnable auto-start on boot:
systemctl enable oneclickvirtCheck status:
systemctl status oneclickvirtView logs:
journalctl -u oneclickvirt -fRestart service:
systemctl restart oneclickvirtUpgrade Frontend and Backend
./install.sh upgradeExcept for configuration files, both backend and frontend files will be upgraded
During the upgrade process, you will be prompted whether you need to customize the frontend file path. If you choose not to customize, it will be extracted to /opt/oneclickvirt/web/ by default
This setting is mainly to accommodate the issue that 1panel cannot customize the frontend file path. The 1panel file path is similar to /opt/1panel/www/sites/beta/index/web, where beta is the name of the website you set up
Deploy Frontend
The installation script will extract the static files to the following directory (if not customized):
cd /opt/oneclickvirt/web/You can use nginx or caddy to serve a static website from this directory. Binding a domain name is optional (but recommended if you want to enable HTTPS easily).
nginx: IncludesOpenResty,1Panelbuilt-in nginx, etc. Configuration is generally similar.caddy: Easier to configure, automatically obtains HTTPS certificates by default (requires your domain to point to the server).
After deploying the static files, you need to configure a reverse proxy so the frontend can access the backend. Below is an example using OpenResty built into 1Panel:
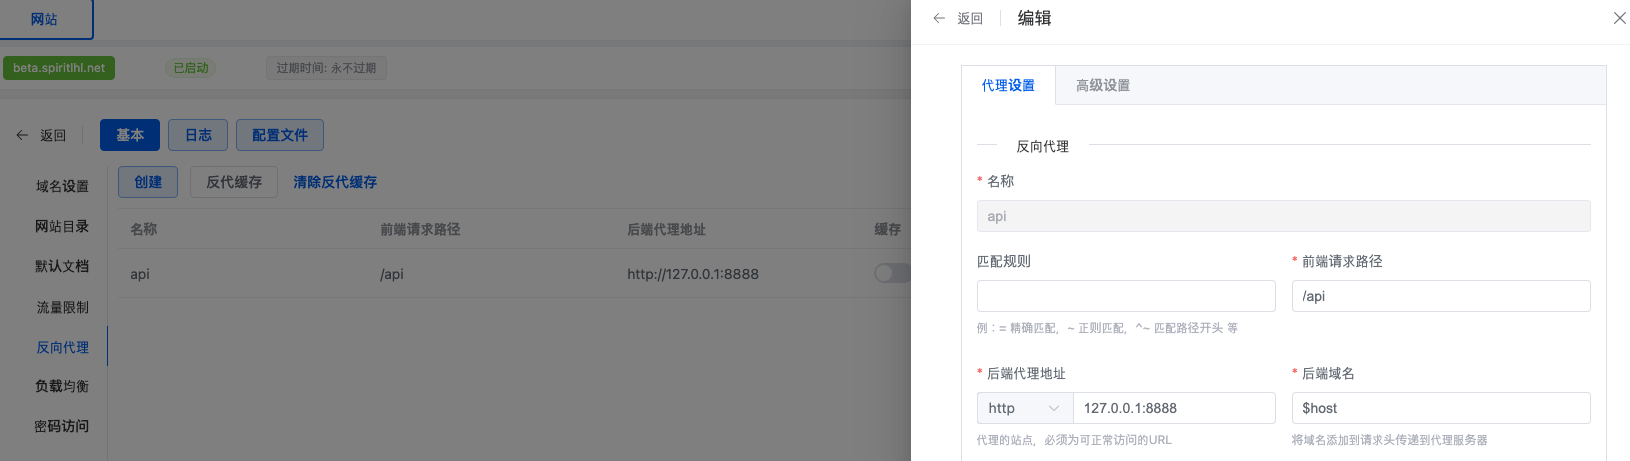
You need to proxy the /api path to the backend address http://127.0.0.1:8888. If you are using 1Panel, you only need to fill in these values. The default backend domain $host does not need to be modified.
If you are using nginx or OpenResty, add the following configuration to your site:
location /api/v1/ws/ {
    proxy_pass http://127.0.0.1:8888;
    proxy_http_version 1.1;
    proxy_set_header Upgrade $http_upgrade;
    proxy_set_header Connection "upgrade";
    proxy_buffering off;
    proxy_read_timeout 3600s;
    proxy_send_timeout 3600s;
}

location /api {
    proxy_pass http://127.0.0.1:8888;
    proxy_set_header Host $host;
    proxy_set_header X-Real-IP $remote_addr;
    proxy_set_header X-Forwarded-For $proxy_add_x_forwarded_for;
    proxy_set_header REMOTE-HOST $remote_addr;
    proxy_set_header X-Forwarded-Proto $scheme;
    proxy_set_header X-Forwarded-Port $server_port;

    # WebSocket support
    proxy_set_header Upgrade $http_upgrade;
    proxy_set_header Connection "upgrade";

    proxy_http_version 1.1;

    # SSL settings
    proxy_ssl_server_name off;
    proxy_ssl_name $proxy_host;

    # Timeout settings
    proxy_connect_timeout 60s;
    proxy_send_timeout 600s;
    proxy_read_timeout 600s;

    # Cache and buffering
    proxy_buffering off;
    add_header X-Cache $upstream_cache_status;
    add_header Cache-Control no-cache;
}If you are using caddy, a configuration without a domain would look like this:
:80 {

    root * /opt/oneclickvirt/web
    file_server

    # WebSocket
    @ws path /api/v1/ws/*
    reverse_proxy @ws 127.0.0.1:8888 {
        header_up Host {host}
        header_up X-Real-IP {remote_host}
        header_up X-Forwarded-For {remote_host}
        header_up X-Forwarded-Proto {scheme}
        header_up X-Forwarded-Port {server_port}

        transport http {
            read_timeout 3600s
            write_timeout 3600s
        }
    }

    # Normal API
    @api path /api/*
    reverse_proxy @api 127.0.0.1:8888 {
        header_up Host {host}
        header_up X-Real-IP {remote_host}
        header_up X-Forwarded-For {remote_host}
        header_up X-Forwarded-Proto {scheme}
        header_up X-Forwarded-Port {server_port}

        transport http {
            read_timeout 600s
            write_timeout 600s
        }
    }
}If you have a domain, simply replace :80 with example.com. Replace example.com with your actual domain. The domain must be pointed to your server IP in advance. caddy will automatically obtain an HTTPS certificate and enable port 443 (no need to manually configure SSL).
View Status and Logs
The installer provides unified lifecycle commands:
./install.sh status
./install.sh logs --lines 200
./install.sh logs --followUninstall
The default uninstall removes the service, program, and default web files while retaining config.yaml and storage:
./install.sh uninstallAfter confirming that application configuration and storage are no longer needed, remove the entire application directory:
./install.sh uninstall --purgeNon-interactive use also requires --yes. The script does not remove databases, reverse proxies, or TLS certificates because other services may share them. Review and remove any custom web path separately.
Windows
View
https://github.com/oneclickvirt/oneclickvirt/releases/latest
Download the latest compressed file for the corresponding architecture, extract it, and execute it in the background.
In the same directory as the binary file being executed, download
https://raw.githubusercontent.com/oneclickvirt/oneclickvirt/refs/heads/main/server/config.yaml
This is the configuration file that will be needed later.
After downloading the web-dist.zip file, extract it and use the corresponding program to establish a static website, similar to Linux, set up the reverse proxy accordingly.
Status, Upgrade, Logs, and Uninstall
- Status: use Windows Task Manager to confirm whether the OneClickVirt process is running.
- Upgrade: stop the OneClickVirt process, back up
config.yamlandstorage, replace the backend andweb-dist.zipfiles with matching files from the latest release, and restart the process. - Logs: inspect console output and the
storage/logsdirectory under the runtime directory. - Uninstall: stop the process and remove the program and web files. Move
config.yamlandstorageelsewhere first when retaining data. Review the database and reverse proxy separately.
All-in-One Deployment
Here we no longer distinguish between frontend and backend concepts. From
https://github.com/oneclickvirt/oneclickvirt/releases/latest
Find the compressed package with the allinone tag for download. Note the distinction between amd64 and arm64 architectures, as well as the corresponding systems.
In Linux, use the tar -zxvf command to extract the tar.gz compressed package. In Windows, use the corresponding extraction tool to extract the zip compressed package, and copy and paste the binary file to the location where you need to deploy the project.
It's best to move it to a dedicated folder, as structured log files will be generated during operation.
(The following instructions will use the amd64 architecture Linux system file as an example)
On Linux, make the file executable:
chmod +x server-allinone-linux-amd64Then download
https://github.com/oneclickvirt/oneclickvirt/blob/main/server/config.yaml
File to the same folder.
On Linux, start the process with nohup and record its process ID:
nohup ./server-allinone-linux-amd64 > oneclickvirt-console.log 2>&1 &
echo $! > oneclickvirt.pidThen open port 8888 of the corresponding IP address to see the frontend for use, such as
http://your-IP-address:8888If you are on a Windows system, you need to start the exe file with administrator privileges, and ensure that the config.yaml configuration file exists in the same folder as the exe file before starting, otherwise a white screen or connectivity issues will occur upon startup. As for how to execute it in the background, explore it yourself. It's also fine to just leave the cmd interface running.
The all-in-one deployment mode is suitable for situations where the local machine does not have a public IP. Your IP address can be localhost or 127.0.0.1, or it can be the corresponding public IPv4 address. Test it yourself in the specific deployment environment.
Upgrade
Stop the process and back up configuration and storage first:
kill "$(cat oneclickvirt.pid)"
cp -a config.yaml config.yaml.bak
cp -a storage storage.bakDownload the matching allinone archive from the latest release, replace only the binary, retain config.yaml and storage, and restart it with the command above.
View Status and Logs
kill -0 "$(cat oneclickvirt.pid)" && echo "OneClickVirt is running"tail -f oneclickvirt-console.logStructured application logs are under storage/logs in the runtime directory.
Uninstall
kill "$(cat oneclickvirt.pid)" 2>/dev/null || trueAfter confirming that the process has stopped, back up config.yaml and storage if needed, then remove the runtime directory. Any external database used by this method must be handled separately.
Docker External-Database Image
WARNING
This method does not include a database. Prepare a reachable MySQL or MariaDB instance and create a oneclickvirt database with a dedicated account first.
Available image versions are listed at:
https://hub.docker.com/r/oneclickvirt/oneclickvirt
https://github.com/oneclickvirt/oneclickvirt/pkgs/container/oneclickvirt
Use oneclickvirt/oneclickvirt:no-db for the latest release and a dated tag to pin a version. The image supports linux/amd64 and linux/arm64.
Fresh Deployment
Replace the example host and credentials with the external database values:
docker run -d \
  --name oneclickvirt \
  -p 80:80 \
  -e FRONTEND_URL="https://your-domain.com" \
  -e DB_HOST="your-mysql-host" \
  -e DB_PORT="3306" \
  -e DB_NAME="oneclickvirt" \
  -e DB_USER="oneclickvirt" \
  -e DB_PASSWORD="your-password" \
  -v oneclickvirt-storage:/app/storage \
  --restart unless-stopped \
oneclickvirt/oneclickvirt:no-dbFRONTEND_URL must match the URL users open. Runtime configuration is stored at /app/storage/config.yaml in the oneclickvirt-storage volume. Reuse that volume and the same database variables whenever the container is recreated.
Upgrade Only in Old Environment
Back up the runtime configuration first:
docker cp oneclickvirt:/app/storage/config.yaml ./config.yamlDelete only the container itself without deleting the mount volumes:
docker rm -f oneclickvirtThen delete the original image:
docker image rm -f oneclickvirt/oneclickvirt:no-dbPull the container image again:
docker pull oneclickvirt/oneclickvirt:no-dbRecreate the container with the fresh-deployment command and continue mounting oneclickvirt-storage. The external database is not changed by this container upgrade.
Fresh Deployment in Old Environment
Remove the container and local runtime-configuration volume:
docker rm -f oneclickvirt
docker volume rm oneclickvirt-storageThen delete the original image:
docker image rm -f oneclickvirt/oneclickvirt:no-dbPull the container image again:
docker pull oneclickvirt/oneclickvirt:no-dbThese commands do not delete the external database. Remove it separately only after confirming backups and dependencies.
View Status and Logs
docker ps --filter name=oneclickvirtdocker logs -f --tail 200 oneclickvirtUninstall
Retain the runtime-configuration volume:
docker rm -f oneclickvirt
docker image rm oneclickvirt/oneclickvirt:no-dbRun docker volume rm oneclickvirt-storage only when deleting local runtime configuration. Always handle the external database separately.
Docker Compose Source Build
Using Docker Compose allows one-click deployment of a complete development environment, adopting a separate container deployment architecture, including independent frontend container, backend container, and database container:
git clone https://github.com/oneclickvirt/oneclickvirt.git
cd oneclickvirt
cat > .env << 'EOF'
MYSQL_ROOT_PASSWORD=change-this-root-password
MYSQL_PASSWORD=change-this-app-password
EOF
docker compose up -d --buildDefault Configuration Description:
- Frontend service:
http://localhost:8888 - Backend API: Accessed through frontend proxy
- MariaDB database: port 3306, database name
oneclickvirt - Database credentials:
MYSQL_ROOT_PASSWORDandMYSQL_PASSWORDfrom.env - Data persistence:
- Database data: Docker volume
mysql_data - Application storage:
./data/app/
- Database data: Docker volume
Initialization Configuration:
When accessing for the first time, you will enter the initialization interface. Please fill in the database configuration:
- Database address:
mysql(container name, not 127.0.0.1) - Database port:
3306 - Database name:
oneclickvirt - Database user:
oneclickvirt - Database password:
MYSQL_PASSWORDfrom.env
Custom Port (Optional):
If you need to modify the frontend access port, edit the ports configuration in the docker-compose.yaml file:
services:
  web:
    ports:
- "your-port:80" # For example "80:80" or "8080:80"Upgrade
git pull --ff-only
docker compose up -d --buildView Status and Logs
docker compose psdocker compose logs -f --tail 200Uninstall
Stop and remove the containers while retaining the volume and ./data/app:
docker compose downAfter confirming that the data is no longer needed, remove it completely:
docker compose down -v
rm -rf ./data/appKeep .env, server/config.yaml, and the source directory for a future restore, or back them up before deletion.
Dockerfile Source Build
This method is suitable for modifying source code and custom builds:
All-in-One Version (Built-in Database)
git clone https://github.com/oneclickvirt/oneclickvirt.git
cd oneclickvirt
docker build -t oneclickvirt .
docker run -d \
  --name oneclickvirt \
  -p 80:80 \
  -v oneclickvirt-data:/var/lib/mysql \
  -v oneclickvirt-storage:/app/storage \
  --restart unless-stopped \
oneclickvirtIndependent Database Version (No Built-in Database)
git clone https://github.com/oneclickvirt/oneclickvirt.git
cd oneclickvirt
docker build -f Dockerfile.no-db -t oneclickvirt:no-db .
docker run -d \
  --name oneclickvirt \
  -p 80:80 \
  -e FRONTEND_URL="https://your-domain.com" \
  -e DB_HOST="your-mysql-host" \
  -e DB_PORT="3306" \
  -e DB_NAME="oneclickvirt" \
  -e DB_USER="root" \
  -e DB_PASSWORD="your-password" \
  -v oneclickvirt-storage:/app/storage \
  --restart unless-stopped \
oneclickvirt:no-dbThe no-db image stores its runtime configuration at /app/storage/config.yaml in the oneclickvirt-storage volume. Reuse the same storage volume when updating the image or recreating the container; database settings entered on the initialization page and other system-level settings then survive replacement, so database initialization is not repeated. Non-empty DB_* variables take precedence over the file, while deployments that explicitly mount /app/config.yaml continue to use that file first.
Upgrade
Pull source updates and rebuild the same image variant used originally:
git pull --ff-only
docker build -t oneclickvirt .
# External database variant: docker build -f Dockerfile.no-db -t oneclickvirt:no-db .Remove the old container, then rerun the docker run command for the original variant while continuing to mount the same volumes.
View Status and Logs
docker ps --filter name=oneclickvirtdocker logs -f --tail 200 oneclickvirtUninstall
docker rm -f oneclickvirt
docker image rm oneclickvirt 2>/dev/null || true
docker image rm oneclickvirt:no-db 2>/dev/null || trueThese commands retain volumes. For a complete all-in-one removal, also remove oneclickvirt-data and oneclickvirt-storage. The external-database variant only uses oneclickvirt-storage locally; handle its external database separately.
Initialization After Advanced Installation
Except for Docker Compose and the Dockerfile all-in-one variant, methods on this page usually require MySQL or MariaDB to be prepared first. Create an empty oneclickvirt database with the utf8mb4 character set and a dedicated account, and restrict the database's network exposure.
After opening the corresponding frontend page, it will automatically redirect to the initialization interface.
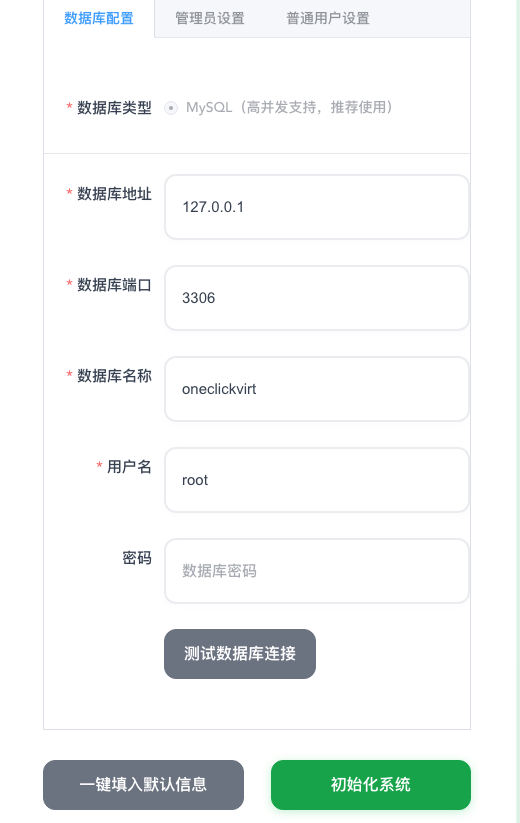
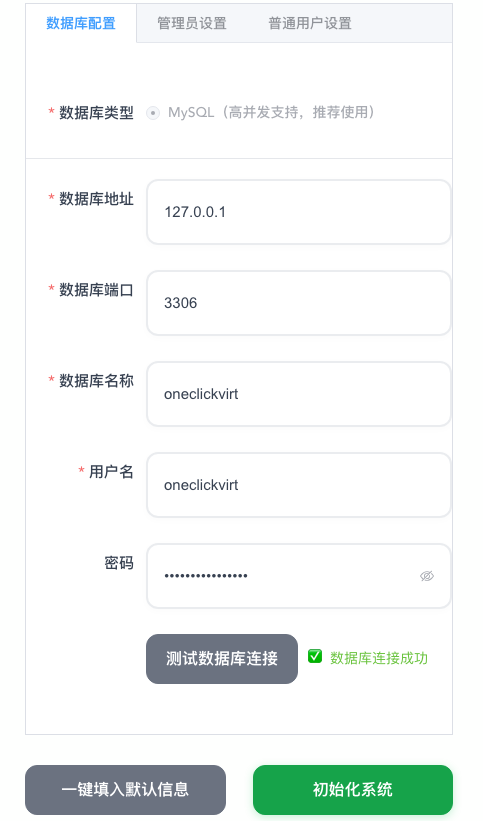
Fill in the database information and related user information. If the database connection test is successful, you can click Initialize System.
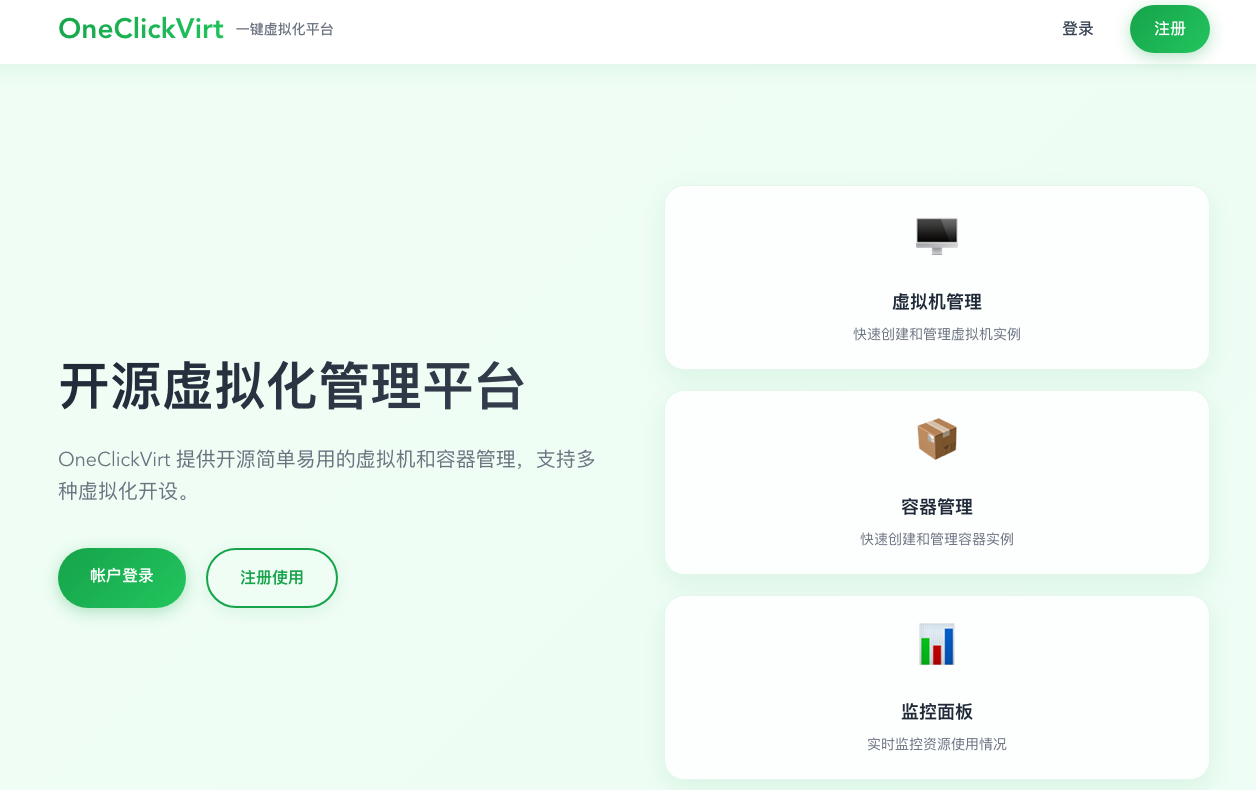
After completing initialization, it will automatically redirect to the homepage, and you can explore and use it yourself.
The initialization form creates the administrator account. Use a random strong password and save the credentials before submitting the form.
During the initialization process, all image seed data is loaded into the database by default, but by default only debian and alpine related version images are enabled. This is to avoid user selection difficulties caused by too many enabled images.
If you need additional types of images, you need to search by type, architecture, and version in the system image management interface under administrator privileges and enable them. Windows, Android, macOS, and other non-Linux/BSD images are also imported as preset seeds, but they are disabled by default and have higher CPU, memory, and disk requirements to prevent accidental creation on low-end nodes. Before enabling these images, confirm that the target provider satisfies the required nested virtualization, disk space, KVM, or Docker special runtime conditions.
After initialization, please immediately change the default administrator username and password, and disable or delete the default enabled test user testuser. This can be done in the administrator's user management page.